


 The Sewing Workshop has been having sew-alongs (SAL) all summer long. (If you’re interested in participating, there’s a Facebook group.) I first was going to participate in the Zayn top sew-along. I made a muslin out of a knit (in a pattern designed for wovens—hmmm), but then the more I looked at the actual design of the pattern, the less I loved it, and just never moved forward. Then when the Cottage Shirt SAL happened, I knew I wanted to make that top.
 I shopped around to all my favorite online fabric stores, ending up at Smuggler’s Daughter, where I found this Max Mara “Water Habitat” print. Isn’t that the coolest print?! It just struck me as unusual, and with the black background, I felt it would go with all of my black slacks and crops.
The fabric arrived when I returned from Bali, and I thought I would get it made up before my Japan tour. Alas. I did make a quick muslin from an old sheet for the body of the shirt, just so I could see where the hem fell and if I needed to cut a Medium or a Large. I wear Large in most patterns, both Big 4 and Indie designers. But with Sewing Workshop, I frequently feel like I’m swimming in the Large. The muslin was a Medium, and I felt that would work.
Let’s get to the review and then I tell you more about my feelings regarding this top:
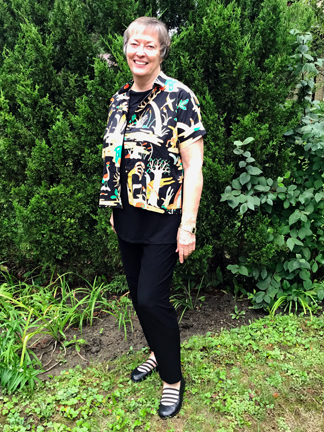
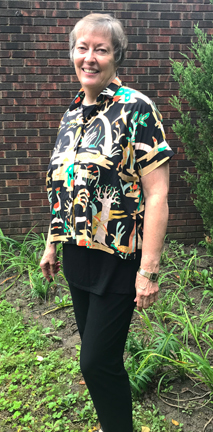
Shirt as jacket, unbuttoned
Pattern Sizing: XS, S, M, L, XL, XXL
After making a quick muslin, I cut a Medium. Should I have cut a Large? This pattern isn’t loose-fitting in the way something like Sewing Workshop’s Balboa is. My Balboa has been ¾-finished for about 18 months and just hanging in my basement until I figure out what to do with its massiveness. And yet its description on the website doesn’t even mention “loose-fitting.”
Shirt-jacket, unbuttoned[/caption]Did it look like the photo/drawing on the pattern envelope once you were done sewing with it? Yeah, I guess.
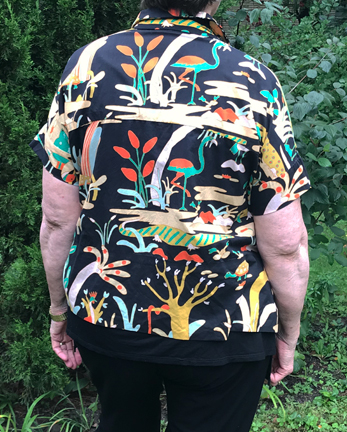
Back view
I do a great yoke burrito, but the collar burrito — not so much. Honestly, I think I attached that collar three separate times. My seam ripper got a lot of exercise with this project.
I’ll be the first to admit that I need instant gratification, or at least in-the-near-future gratification. I got so frustrated with this make that I totally lost my mojo. The only thing that got me through this, at some point, was my refusal to relegate it to the UFO stack.
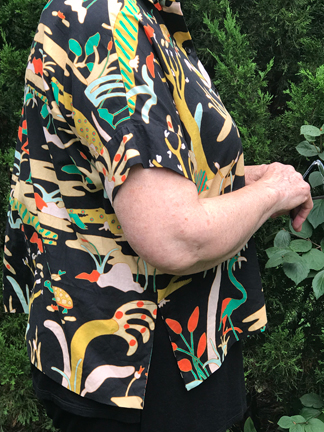
Side view, showing vents
My other complaint is the sleeve band. The instructions have you leaving the side seam open ⅝” below the armscye. I had a devil of a time getting that sleeve band set in without unintentional mini-tucks.
One more note—I interfaced both collar pieces, and I’m sorry I did. Use a lightweight interfacing and only do one side.
Fabric Used: Lightweight 100% cotton from the looms of Max Mara, purchased from Smuggler’s Daughter. I think a drapier lightweight fabric—maybe even silk—would have been better.
Pattern alterations or any design changes you made: None that were intentional. 😉
Would you sew it again? Would you recommend it to others? I doubt I will sew it again, although I will sew the sister shirt, London. I’m thinking that will be better on my body. I will only recommend it to Advanced Intermediate sewers with slender bodies.
Conclusion: Great idea, great design. An unsuccessful sew—in my opinion and through my eyes. (Note to self: take your next pictures after supper, not after lunch! Midday skylight is not your friend.)
So how did I feel about this shirt? I wanted to love it. In my mind, it was going to be a wonderful shirt. I don’t love it, and I’m sad about not loving it. It may get offered around my group of girlfriends the next time we meet for dinner. And I might make it again with these changes: a lighter fabric with more drape, probably one of the silk charmeuse pieces that are in my stash; use just the collar stand instead of the full collar, maybe even making the stand a little taller; and lengthening the body 2″. It might even be wise to cut it in Large rather than Medium. I’ll let you know ….
If you make this shirt, I’d love to see your review and learn how it went for you. Good luck!
Here are links to the sew-along files on the Sewing Workshop blog. My advice is to read the instruction sheet, then the SAL instructions, then back and forth a couple of times until you’ve really gotten it into your brain. And I wish you the very best of luck. I think this shirt would be great on some bodies—just not mine.
Cottage Sew Along Part One
Cottage Sew Along Part Two
Cottage Sew Along Part Three
Cottage Sew Along Part Four
Cottage Sew Along Part Five
Cottage Sew Along Part Six
Cottage Sew Along – Print Matching