Enigma Pouch, Round 3

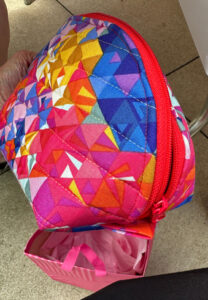
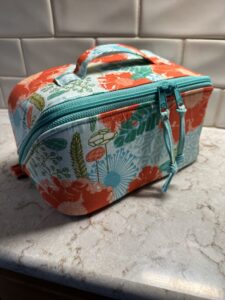
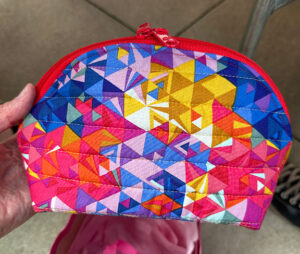
And another Sew Sweetness Minikins 4. This one was designated for my daughter-in-law, as they were colors I knew she’d love. I don’t remember when I “invested in” this fabric, but it’s been in my stash for quite a while—one of those too-beautiful-to-cut-into fabrics.

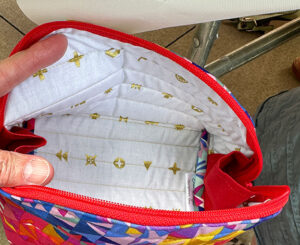
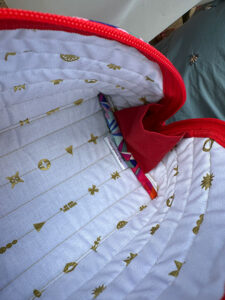
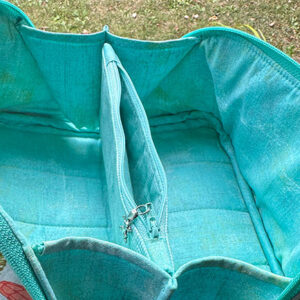
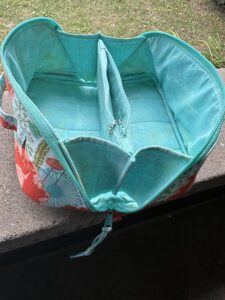
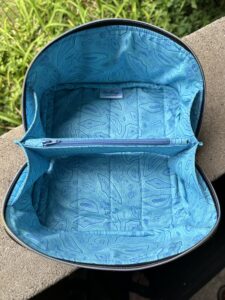
There was a little snafu in the construction process. The side pieces, which straddle the opening, between the front and back, are called accordions. There are four pieces, two for each side. They are to be sewn, right-sides-together, with a seam horizontally along the top and the bottom. Then they are to be turned right-sides-out and carefully pressed. The accordion then has raw edges on the sides, and finished edges on the top and bottom. The raw edges are then sewn into the inside of the exterior zipper edge, resulting in the accordion being completely finished on all four sides: no raw edges.

But Miss “I’m just going to whip through this construction so I can get back to practicing for my show rehearsal tonight” somehow sewed each set of two pieces wrong sides together, with raw edges on all four sides. When I discovered this error, the side edges of the accordion were already sewn into the exterior zipper seam. I was at the final step of the pouch construction, and could not back up to do the top and bottom seams of the accordion correctly.

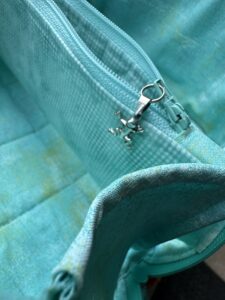
The only way I could think of to solve my mishap was to hand-sew a narrow piece of binding along the top of the accordion. (Click on the photo above and then zoom in on your device to see that binding along the top of the two accordions. You’ll notice on the left edge of the accordion top closest to you in the photo, there’s a tiny gap between the left edge of the binding and the zipper tape. Along the bottom of each accordion, I carefully trimmed the raw edges, then applied FrayCheck to the raw edges, knowing there was not way I could hand-sew a strip of binding in that tight space.

I was at a loss on what to do about this bag. I had made it specifically for my DIL. Should I just keep it for myself and find some other suitable fabric to make another for her? This salmon and turquoise fabric that I knew she would love was long gone. I’m pretty sure I purchased it in 2018, and every search of the internet to find some for sale was a total failure.

I sent her the pictures and asked her what she thought. Being the kind and thoughtful person that her mama raised, she said she loved it and wanted it and didn’t care about the raw edges, that she couldn’t even see in the photos. So off it went to Northern Lower Michigan, and I imagine it’s already filled with her cosmetics.

Tomorrow I’m driving up to attend family weekend at Interlochen Arts Academy, where she works and her daughter is a brand new freshman. I imagine if I peek into the primary bedroom and bath, I’ll see the pouch there, hard at work.

Now I only have two more Enigma pouches on my to-do list: one for myself and one for my son’s Mother-in-law. I’m hopeful these will have zero snafus!!

The Drop Zone

The Drop Zone is the newest pattern from Patterns by Annie designer Annie Unrein. The finished pouch unzips to make a tray. It’s a quick and easy-to-make pattern that comes with instructions for three sizes. The Small pouch finishes to 2½” high x 5″ wide x 2½” deep closed, and 2½” x 5″ x 5″ open. Size Medium finishes to 2½” high x 7″ wide x 2½” deep when closed, and 2½” x 7″ x 5″ open. Size Large finishes to 3″ high x 9″ wide x 3″ deep closed, and 3″ x 9″ x 6″ open. For my first three tries with the Drop Zone, I made Large.

The cost to make the pouch is minimal. It takes one 24″ or longer handbag zipper; a fat quarter of the exterior fabric and a fat eighth of the lining fabric; a 12″ x 16″ (max) piece of ByAnnie’s Soft and Stable®, the wonderful foam stabilizer created by Annie; a 6″ x 13″ (max) piece of Pellon Shape Flex fusible woven facing; and thread to coordinate with the chosen fabrics.

With most any smaller bag or pouch pattern that comes with multiple sizes, it’s smart to start with the Large or Medium size until you get the hang of the pattern. As this is my summer of trying to decrease the size of my fabric stash, I’m trying to use up fabric I’ve been hoarding for a long time. That intention comes with the hope that I won’t have to purchase any extra fabric or notions to reach the finish line on the construction.

The first I’m showing you is the third of these bags I made. I made the first and second bags with my daughter-in-law and 13yo granddaughter in mind. My son complimented me on the bags when the package arrived. He said he tried to snag one of them for himself, but was quickly told “no.” So I dug into my stash and found the perfect fabric for my software engineer son. It’s from Hoffman International Fabrics and is called “Circuit Surfing.” I believe I found it in Josephine’s Dry Goods fabric store in Portland, Oregon, about 25 years ago. It’s been waiting for the perfect time. The lining I chose was Radiance in Lime from Whistler Studios for Windham Fabrics. It perfectly made the colors in that exterior pop. I love how the two fabrics work together. And that Radiance comes in a whole bunch of colors. It’s great lining fabric that has the ability to complement any number of prints.

For my Drop Zone2, I chose two Windham Fabrics coordinating prints from the Midsummer collection by Hackney and Co. The exterior was Honesty Seed in Sage, and the lining was Wildflower Script in Sage. I thought my daughter-in-law would enjoy this print, would find it soothing.

If you like these two prints, there are many pieces from this collection still available on Etsy. Search “Windham midsummer.”

I added a fabric zipper pull onto the metal zipper pull, making it easier to grab. The photo doesn’t show it, but you can see a similar pull on the photo in the preceding paragraph. It’s a free pattern, Zipper Pulls, offered by By_Annie.

All three of these makes are in Size Large. When I work my to-sew list down a little farther, I’d like to make a set of all three in Small, Medium, and Large, and see how they nest. They are clever, multipurpose bags. I can think of all sorts of items that would travel well in these pouches.

My first stab at the new pattern, Drop Zone1 was done up in a bright print that I’ve, predictably, had for years. It caught my eye once upon a time, and has been in my basement ever since. These colors were vibrant and fun, and I added a swivel hook onto one of the pull tabs. Imagine carrying all your adapters in it, and then hooking the whole thing onto the outside of your carryon. I think I’d give that a thumbs-up!

The exterior fabric is La prima Stella by Yamashin, Kanebo print. If I could find it again, I’d buy more. It’s a treat for the fingers and the eyes. The lining might have been sold as a batik or a hand dye. Not a true batik, but varying shades of a turquoise-blue. It looks like the dye pooled up in places. Really lovely.

There will be more of these pouches in my future. Watch for them.

The Second Enigma Pouch

Enigma PouchIf you read the post preceding this one, you know how much I love the Enigma Pouch, designed by Sara Lawson of Sew Sweetness patterns. If you haven’t seen that post yet, here’s the link. The Enigma is part of the Minikins Season 4 collection of patterns, which was released in mid-April, 2023.

At the end of that post, I said I would make another to gift to my step-granddaughter, newly graduated from the 8th grade in Traverse City, Michigan. But, for some reason, I had a very difficult time getting this pattern to come together, and I really want one of these Enigmas for my travels. So this may just belong to me. I’ve got two similar bags in progress now, a pattern called “The Drop Zone,” designed by Annie Unrein of by.Annie patterns. I believe she gave them that name because they open out to become rimmed trays you can drop makeup tubes or quarters or earrings into at the end of a long day. Those would function similarly to the Enigma, and seem to be a little simpler to make. If they work the way I envision, then I will keep this Enigma for myself. Stay tuned on that front.

The second Enigma uses the same exterior fabric as the first, a similar zipper with a different zipper pull, and the same lining design but in a different colorway: “Topaz.” I went through the same mental gymnastics while constructing #2, deciding whether to include the zippered pocket or skip it. I opted for imclude.

My construction challenge came when I sewed the side panels to the bottom panel. At that point, the Pull Tab has already been basted to the Bottom Panel. When pinning or clipping the Side Panels to the Bottom Panel, right sides together, the Pull Tab is sandwiched between the two panels. If I had paid very close attention as I was pinning the panels together, I would have realized the zipper ends were not centered on the Pull Tab. Ugh! It’s funny how a such a seemingly small error can cause so much extra work!

I sewed all the way around the Bottom Panel, flipped it right side out, and realized I had only the tiniest misaligned Pull Tabs to hold onto while closing the zipper. Much seam ripping and realigning and resewing followed before I finally felt that the Pull Tabs were lined up well enough for me to call it done.

It’s finished and has been treated with ScotchGard and is ready to head to New Orleans in a few months for a family wedding. I think I’ll love it once I see it in action. It sure took me long enough to get here!

My First Enigma Pouch

And there will be more to come!

Every couple of years, designer Sara Lawson of Sew Sweetness designs a collection of bags and pouches that are relatively easy to sew and comparatively less expensive due to a minimum of hardware. Yes, the bundle is pricey, but always worth the expenditure, in my opinion. There are typically twelve or thirteen patterns in the bundle and they make great gifts.

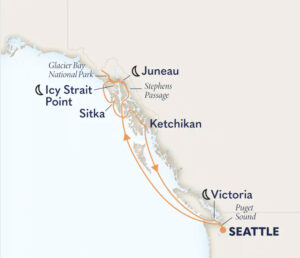
And a gift is just what I needed. My elder son, who lives in the D/FW Mid-Cities, has a lady friend now, after a long spell with no special person in his life. He is the happiest I recall ever seeing. The new partner and I haven’t met in real life yet, and may not before we meet in Seattle a year from today to cruise the Inside Passage to Alaska. But, in communications with them, I keep reiterating how happy I am that they have met.

So, in my position, what does a bagmaker do? Why, this bagmaker makes a bag!

Meet the Enigma Pouch, from Minikins 4. Based on her fabric choices in the illustrated bag, I believe Sara has envisaged it being used by crafters and sewists to corral their most frequently used notions. In my perfect world, I would use it for make-up or hair supplies when traveling.

I vacillated about inserting the zippered pocket across the interior. I was concerned that at about 7″ wide and only 3″ tall, it wouldn’t be very useful. But I finally decided to go with it. When I make one for myself (soon!), I can compare mine with this one and see which I prefer.

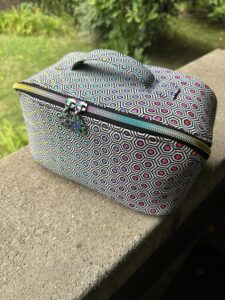
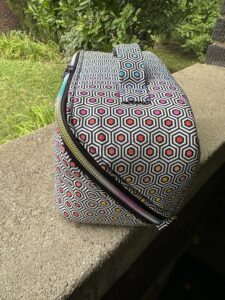
For this first go-round, I chose two coordinating fabrics from Tula Pink’s True Colors collection: Hexy Rainbow in Ink for the exterior, and Mineral in Agate for the lining. I gave Son’s Partner the choice of the Agate (pink) or Topaz (pale blue) and she chose the first. Then, having decided to change the branding of my work, I attached the first of the new JanBags labels. I believe I got that zipper from Zipper Valley. It is “Black – #5 Rainbow Nylon Coil Zipper Tape.” If you make bags and haven’t tried zippers-by-the-yard yet, what are you waiting for? They’re so easy to work with! I can’t identify the pulls, but the finish is gunmetal. By the way, I always waterproof my bags, inside and out, with ScotchGard. Any stains should be able to be removed with a damp cloth.

It’s a pretty straightforward bag to make. I goofed up on attaching the side to the bottom, but it was my own damned fault—I wasn’t paying attention and was hurrying to finish the bag before leaving on vacation. If you are a visual learner, as I am, there’s a video that walks you through the complete construction of the bag.

This was shipped off to Texas the day before we left for a week in Northern Michigan. When we get back, I’ll finish cutting out all the pieces and sewing the second bag, which will go to my almost-14yo granddaughter who just graduated this week from 8th grade in Traverse City. Then I’ll make one for myself.

So, for now, bye from Northern Michigan.

A Tote for a New Baby

I love the excitement that enthuses a family when a new baby is on the way. I first learned about this Little One shortly after her grandmother-to-be did, and have felt a special kinship because of that serendipity. So it’s natural that I would want to sew something to welcome the babe. I decided to make a bag that would benefit the grandma, the mom, and the babe. Since the grandmother and the mother work together, I chose a tote bag the mom could use when Little One was being transported to grandma—something that would carry all those baby necessities that are required to make all parties comfortable and happy.

I turned to my favorite pattern designer, Sara Lawson of Sew Sweetness Patterns. She has a free pattern that she uses as incentive when new followers sign up for her email list. It’s the Oslo Craft Tote. Sara’s intention was to hold a sewist’s tools when going for a play date with another sewist, or when heading to a class to learn something new.

This tote has pockets galore. The front has three small pockets, each side has a pocket with a snap flap that closes the pocket. The back has a long slip pocket, and the interior is divided into three equal sections.

That divided interior section caused me the most trouble. Somehow, when cutting out the eight pieces that become the divider, I cut two extras. I made the pocket pieces that comprise the pockets on each end of the lining. But as I assembled that divider insert, I grabbed those two extra pieces and left off the end pockets. Oy! Jack the Ripper got some exercise before I finished the insert.

The rest of the bag components were fairly easy to assemble, although time-consuming. Each completed step made me smile. I loved the way this bag looked. Absolute love.

I wanted to tuck some sort of gift inside the bag. I searched several sites for baby blankets and found this Crane baby blanket in a shade of green that went beautifully with this bag. It was not available in any store near me, but Amazon carries the Crane blankets, so I was all set. Amazon link.

I delivered the bag to the grandma a couple of days after the babe made her surprise early arrival. She loved the bag and delivered it to her daughter shortly thereafter. A few weeks later, I received the most beautiful thank you note I’ve ever received in my life. I have since met this beautiful little girl. She’s healthy and happy, and the whole family is in love with her.

And I’m feeling very lucky to be able to bring happiness like this.


Legacy

If you’ve read my blog posts over time, you know that I derive much pleasure and peace from my sewing activities. The knowledge that my grandchildren share some of that love with me makes me very happy. So imagine my joy when my grandson, known as Co, texted me last week to tell me he wanted to get a sewing machine, and asking if I had any ideas.

Co is two months short of 21, and a junior at the College of Wooster in Ohio. He is a lover of all things artistic, including especially dance, musical theatre, and photography, and of helping people who are struggling in one way or another.

I helped him make a t-shirt about 10 years ago, and he’s been helping out in the costume shop at Wooster, so this sewing machine discussion was not just a statement from nowhere. He had been trying different things with fabric and using glue to “sew” it together – wondered what that garment piece would be like actually sewn. When I told my partner about this conversation, he suggested I give my grandson one of my machines. WHAT?!

Co doesn’t like to ask me for things. I knew, when he asked, that he was figuring he would pay for this machine himself, and was thinking maybe he could get a machine for around $125. (I started saving for his education when he was born, and he frequently expresses his gratitude for the college tuition payments and the fact that he will graduate in a year with no debt. So he tries not to ask for more.)

I called him yesterday to ask if there was any space in his schedule to meet me in Cuyahoga Falls at Barnes Sewing Center to look at sewing machines.

When the owner, Chris, was free of customers, we started walking around the store and talking. I bought my second Juki and a Baby Lock coverstitch machine from him a year ago. I told him I was thinking of Juki or Baby Lock or maybe Bernette. When I said I wasn’t so sure about Bernina anymore, he said the Bernettes were made by Janome. I liked that the Baby Locks I was looking at were small and lightweight – perfect for a dorm room. He told me they were made by Brother, and we walked over to the Brother table, where Co fell in love with the Pacesetter Innov-ís PS500. We ended up getting the machine, extra bobbins, decent sewing shears, five spools of thread, a small purple Oliso iron and and ironing/cutting surface, three packs of needles (11, 14, and denim), and a marking pen, along with a trolley case that he can store everything in, in his room. I hope/believe that once he is properly equipped, he will fall as deeply in love with sewing as I have. I think I’ll make up a couple of bag kits out of my stash to see if he also falls in love with bagmaking.

When I was a child, and it was time to add another musical instrument to my skillset, my parents would get a good, new instrument. When my children were young, I would do the same for them. When Tyler started playing drums and asked for a drum set, I traded in my 30-year old clarinet and oboe to buy a new drum set for him. I didn’t want Co to be learning on a used machine and then have to drive many miles to get the machine adjusted or repaired. I’ve never bought a used car. I buy new and take very good care of my purchases, making them last as long as possible. That’s just the way I was raised. May this new Brother sewing machine last Co for 30 years of contented stitching.

The love of sewing, passed from my mother to me, and down to Co and Celeste, continues.

A Hostess Gift

We have a sextet of friends who dine together most Sunday nights at a Mexican restaurant that’s midway between our homes. In the week leading up to Super Bowl Sunday, Mary Lou suggested she cook dinner on Sunday evening and we eat at their lovely new condo so we could escape the noise of the restaurant as people cheered and screamed over the game. (A lot of local football fans are partial to the San Francisco team, as the owner is from Youngstown. And other diners are just passionate about football, no matter who is playing. That much passion adds up to noise.) When MaryLou emailed the invitations, she included the directive that we didn’t need to bring anything, unless we wanted something other than wine or beer to drink with dinner. Well, we Southern Belles have a code we live by concerning walking into someone’s home empty-handed. I couldn’t ignore that code.

Mary Lou is a contemporary quilter who uses her hand-dyed fabrics to make fabulous quilts. Every so often, she will pass along to me scraps of her hand-dyes that didn’t make it into a quilt. I stash them away, then occasionally use them in my bag making.

So what better hostess gift for a quilter than something created from her own skilled work?

Are you familiar with the Japanese practice of Kintsugi? It involves mending broken things with gold or precious metals. A number of years back, Mary Lou incorporated the technique into her hand dyed fabrics and the result was magical. I inherited a few pieces of this “mended” fabric. While looking through my stash for suitable fabrics for a hostess gift, I found a soft blue embellished with silver. Then I remembered I had some silver vinyl that would go well with the blue and silver to make a Sew Sweetness Cotton Candy Pouch. That was the pattern I used for granddaughter Caroline’s purple bag while I was in Michigan.

I didn’t get the bag finished in time to walk in carrying it on Sunday evening, but I finished it Monday night and will drive up to her house to drop it off as soon as I finish this post.

The exterior fabric is high quality cotton. If you want to try dyeing fabric, look for an unbleached cotton that’s marked PFD—Prepared For Dyeing. The Procion dyes and other required chemicals can be purchased online from Dharma Trading Co., located in San Rafael, California. I sometimes purchase from Pro Chemical and Dye, located in Fall River, Massachusetts. My favorite books that offer a good intro to fabric dyeing are “Color by Accident: Low-Water Immersion Dyeing” and “Color by Design: Paint and Print with Dye,” both by Ann Johnston. My other recommendation, if you’re thinking of diving into this art form, is “Exploring Fiber Reactive Dyes ,” by Claire Benn.

The lining fabric has a gray background with white printing and some little metallic silver dots. I thought it was the perfect complement to the blue and silver. The collection is “Heavy on the Metal,” and the print is “Play on Words” by Jamie Fingal for RJR Fabrics.

The little fabric pull on the exterior zipper is detailed in the free pattern “Zipper Pulls” from By Annie. Thanks to Annie Unrein for her creativity and generosity.

The Cotton Candy Pouch is part of the Minikins Season One 12-Pattern Bundle from the brilliant bag pattern designer Sara Lawson, who owns Sew Sweetness.com.

If you’d like to see some of Mary Lou’s stunning quilts, go visit her website.

And a Second Granddaughter Pouch

Took off for Northern Michigan after packing the car with—I thought—everything I would need for a visit of indeterminate length. And I left the new bag for my granddaughter on the dining table. Argh!

Fortunately, I had packaged enough projects to keep me busy, including another pouch for the granddaughter. And I was able to complete it before she left on her class trip to Atlanta, GA; Birmingham, AL; and Montgomery, AL.

Here’s her new JanBag (her term, not mine ) to carry her makeup. Pink and purple are her favorite colors. So now she has a new Cotton Candy Pouch, size Large. Tula Pink True Colors Fairy Dust in Daydream for exterior and in Whisper for lining.

I love the “Handmade” zipper pull. I believe I purchased them from My Handmade Space, but Zipper Valley also carries a similar pull. I love including special little touches like this to my bags.