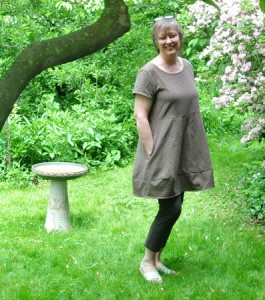
 Blogless Anna, whose writing and sewing I love, made a Tessuti Eva dress a few months ago, and it stuck in my mind. I thought if Northeast Ohio ever escapes winter, I might like it for a summer dress. A couple of days ago, on one of my 25 mile drives to accompany a high school chorus, I stopped at Olive Grace Studios, a sweet little quilt shop about ten miles north of my house. There, tucked under the front counter, I found this great linen covered with Xs, sorta sashiko quilting, but not really. It called out “Eva” to me. Link to the dress pattern.
I won’t write a full review right now, as today and tomorrow are actually summery. The Jazzman just got off work and we’re racing out the door to drive up to the lake (Lake Erie, if you’re not from around here) and hang with our pals.
Here are my thoughts:
- If you’re making the dress, a softer fabric is probably better than a midweight. I feel this is a little stiff and, hence, makes me look a little more portly than I actually am.
- I love the bound neck and sleeves. The bound hem? Not so much. In fact, tomorrow while the rest of our friends are golfing, I’m going to sit with some nice music or an audiobook and rip out the hem. Then when I get home, I’ll interface and turn up the edge by ½”, giving it a smoother, softer, and less obvious hem.
- The pocket instructions are a little wonky, for my taste. There seemed to be an emphasis on sewing to the notch and sewing the pocket bag completely separate from the side seams. I sewed and ripped and sewed several times.
<Side Seam Pocket Tutorial On>
I believe the better way would be to sew the each of the four pockets RS together to the front and back side pieces, matching the notches. The seam width would be a smidge smaller than the seam allowance for the side seams. So in this garment the seam allowance is ½”, so my seam to attach the pocket pieces to the side pieces would be about ⅜”. After sewing those four small seams, I would press the seam allowances toward the pocket, then on the front pieces only, topstitch the pocket to the seam allowances. (In the picture, you see the front of the pocket and its topstitching at the top of the picture. At the bottom you can see the back seam with no topstitching. You can click the picture to enlarge.)
Once that’s done, pin front to back on the side seams, pinning the pockets together. Stitch from the top (backstitching to secure the first couple of stitches) down to the notch, reduce stitch length to 0 and take one stitch to secure, then raise presser foot and pivot, lower the presser foot, return the stitch length to the previous setting, stitch around the pocket bag to the bottom notch, reduce stitch length to 0, take securing stitch, raise presser foot and pivot, lower presser foot, and stitch to the bottom, backstitching at the end of the seam to lock the stitches.
Serge or zigzag the raw edges. Clip the seam allowance at the notches, being careful not to cut the seam stitching. Press the seam flat, then press the seam allowance to the back and the pocket and its seam allowance to the front.
<Side Seam Pocket Tutorial Off>
It sounds complex when written this way, but once you’ve done it a couple of times, it’s very logical. To me, this method avoids grabbing bits of seam alliances where you don’t want to grab them–and therefore avoids a lot of seam ripping.
There was one more disappointment with this fabric. I finished the dress, drove to the lake, and sat down in a wicker chair in our friends’ lake house. When I leaned over to pick up something, I realized a rough edge in the wicker chair had snagged one of the thread Xs and pulled it out about six inches. My heart sank to my feet. Now that I’m back home, I’ll take a needle and try to pull it back through and secure it. But I may get to the situation where there are so many thread snags that I have to just pull them all out and have a plain linen dress.
C’est la vie!
P.S. Ran back to the quilt shop today to identify the fabric. It’s Diamond Textiles’ Primitive Collection, very similar to PRF 707. To my eye, the base fabric is taupe-olive, and the threads are cream and a blush pink. We’ll see how long these threads last. 🙂


