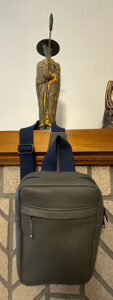
 My partner of twelve years had another birthday last Thursday. On Monday, I remembered I had thought, six months ago, that I wanted to make him a small backpack/sling bag for future travel experiences. I had a bag in my head that I had seen somewhere as I cruised through the websites or Facebook pages of the various independent bag designers whose patterns I love. I checked all the pages I could think of, but couldn’t find that bag that had formed in my imagination. I posted on the “PDF Love of Bags” Facebook group asking for help identifying the sling bag I was envisioning. Those comments pointed me to the Noodlehead Sandhill Sling.
The first picture is the truest representation of the color. The vinyl is a deep green-gray. The first zipper I tested with it was an olive green, which would have been fine. But when I found the lining fabric in green, navy, and gray triangle confetti on cream, I opted for navy zippers and webbing.
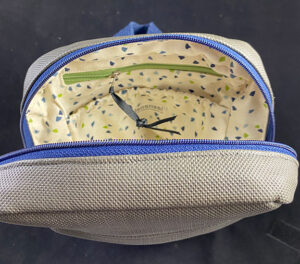 I watched the Sew Creative “Video tutorial on the Sandhill Sling Bag By Noodlehead” on YouTube and added two zippered pockets to the interior. The pocket I placed above the elasticized-top slip pocket is only about 3″ deep. It’s perfect to drop your keys or change or other small items you want to find easily into. The exterior closure, the exterior pocket, and the front interior pocket all have blue zippers. I gave the key pocket a spring green zipper to jog the recipient’s memory when he reaches in to grab his keys.
The other tip I picked up from the Sew Creative video was to put two D-rings on the bottom, one on either corner. This way, if you have a habit of just slinging the bag over your shoulder and tucking it under your arm, you can clip the strap to whichever side makes it more comfortable for you.
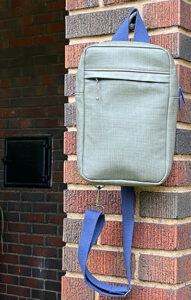 The finished bag dimensions are 7” wide by 3” deep, 11” tall. If a user has very large hands, they might have trouble reaching into the pockets to retrieve the contents. For that person, you might want to make the exterior pocket with the flap closure and no zipper. If you really want the exterior zippered pocket, then you could skip the zipper cover. The interior pocket zippers are only about 6″ wide, therefore snug. But my piano hands fit nicely inside to grab my imaginary contents. The interior pockets are absolutely not necessary or required. This is the perfect bag to just carry a couple small bottles of water and a foldup map for a two-hour hike or a three-hour 🛥️ tour. 😉
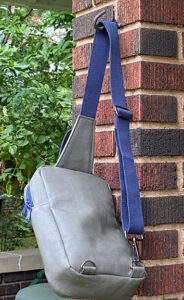 I used Dritz 1½” polyester (feels like cotton) webbing for the strap. My local JoAnn’s doesn’t carry the navy in 1½”, so I ordered it from Amazon and had it the next day.
[Note to self: Noodlehead carries the webbing in 1½” and 1″ widths. Plan ahead.]
When the bag was introduced, the designer, Anna, sponsored a sewalong. There are YouTube videos on the Noodlehead Sewing Patterns channel. They’ll get you through any tough spots.
One feature Anna added in the sewalong video was a carry strap at the top. She cut it to 9″ and sewed at the top of the bag. I used the leftover 1½” strapping for mine, but next time I will use her recommended 1″ wide strapping. It’s easier to grab. But I think this carry strap is a great thing to have on this bag. I’m glad I added it.
Other details I added: I bought some zippers in Bali four years ago that had cool dangles from the pulls. They’re very short zippers, maybe 5″, and I rarely find use for them, so I just used a thin screwdriver blade to open up the top of the pull and slip off the cute little metal ball dangle. I used a split ring to connect it to the pull of the exterior pocket zipper. My top exterior zipper is a regular YKK zipper with long pulls, so I didn’t add anything to that. The front interior zipper has a gunmetal “Handmade” dangle hanging from it, and for the key pocket, I found a strip of ⅛” wide navy ribbon which I threaded through the pull for ease in opening the zipper. And, of course, my Jananza label is fused to the elasticized-top interior slip pocket. These little details always bring me joy. Anna adds waxed cord zipper pulls to the main zipper. She carries the cord in several colors on her website.
All the hardware on the bag is gunmetal, as I felt that went well with the darkness of the vinyl.
Do I love this bag? Yes! Would I make it again? Yes, although probably not with vinyl. I would, however, make it out of waxed canvas or cotton for the durability, or out of a favorite quilting cotton for the softness and variety of fun fabrics.
Here are all the pictures of the project.
Sandhill Sling Photo Gallery
Two extra pictures for Alycia, who commented below. (Click or touch to enlarge.)
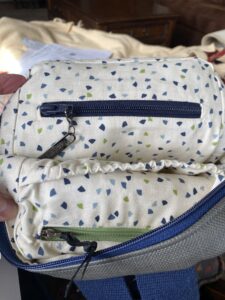


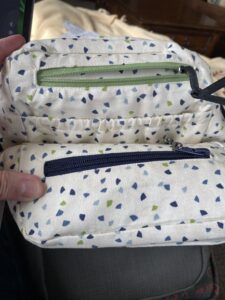
So did Himself like it?
He didn’t just like it, Linda, he loved it! Even if he doesn’t want to take it on this weekend’s getaway, I’ll be tucking it in the car to show my neighbor, who designed the vinyl, when we see her and her family at their lake house.
Hi! I love your bag and the modifications! I am making a Sandhill Sling for my SIL. She wants more pockets than the pattern shows. I love the little zippered pocket you added above the elasticized pocket. And it looks like a 2nd zippered pocket on the other side of the interior. Do you have any tips you can give me as to how you did the zippered pockets? Measurements? I know you said the little zippered pocket was 3″ deep. The zipper was 6″ wide. So is the pocket 6″ wide? How deep was the other pocket? I have seen some videos on how to do an inside zipper pocket. But just haven’t done one before. Which video do you recommend? Also, I am using a natural colored waxed canvas. The lining shows through the canvas. Does this mean the pockets/contents of pockets will show, too?
[Just wrote a long detailed response and hit “Post,” but the ReCaptcha has expired and I lost the entire post. Argh!]
First, the best videos on bagmaking are created by Sara Lawson of Sew Sweetness. Here’s the zippered pocket tutorial link: https://youtu.be/ET3IpIDq02o
When inserting the pocket, you’re going to lose a half-inch on either side of the zipper, so your 6″ zipper finishes to 5″. You’re using one piece of fabric for the pocket, so it’s going to be 1″ (1/2″ + 1/2″) wider than the interior of the finished pocket. Ditto the length. If you want a 3.5″ deep pocket, you’ll cut the fabric 7″ + 1/2″ + 1/2″ = 8″. so the flat piece of fabric for the pocket would be about 6″ wide x 8″ tall. But defer to the measurements Sara gives you in the video.
The little pocket is the right size for a flat room key or a credit card, ID, and a couple of $$. I can just insert my fist into either pocket to retrieve things. The larger pocket is about 7″ deep – when I put my extended hand in, the top comes to the wrist bone above my thumb.
Now, the bigger question. I’m a little troubled that your nice waxed canvas is not opaque, but rather lets you see the lining fabric. Ugh. I think the solution for that is to interface your LINING fabric (NOT the canvas) with SF-101, Shape Flex (made by Pellon, available at Joann’s or WalMart that carries fabrics or Amazon). Why not the canvas? Because the hot iron on that lovely waxed canvas is going to create a great, big mess. The iron will melt the wax and destroy the beautiful finish. But using the Shape Flex on the wrong side of both the lining and the pocket fabric should diffuse the fabric print and make it not visible – or not so visible – through the canvas.
Back to dimensions – I’m going to stick a couple of new pictures into the content above. The “margins” above and to the sides of the zippers are about .75″.
I hope this answers your questions. If there’s anything else, ask away here, or you can reach me at jancrews at gmail.
Best wishes with this project. I’m sure your SIL will love it!
Jan