


 A Grandma Sewing Tutorial
I never had to have my books covered in high school. At least I don’t remember having to cover them, but that was a long time ago. I barely remember what classes I took in high school. I do remember, however, cutting class as much as possible during my junior year. I didn’t love high school.
My sweet DGS is now three days into his high school experience. He texted me the other night and said he had a sewing project to complete before Friday, asking when I’d be available to assist his design efforts. When I asked what he needed, he said he had to sew a book cover for his algebra book. I tried to ask the correct probing questions to see if the teacher actually used the word “sew.” I suggested all the brown-paper-bag covers I had seen through the years, but he was adamant that he was going to sew it.
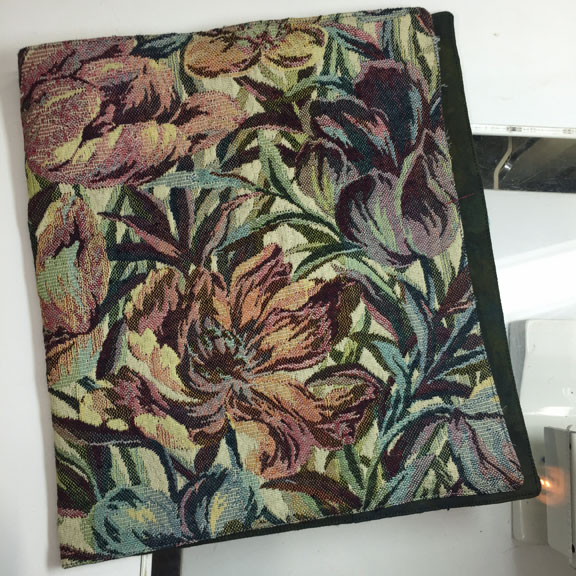
I quickly cleared my calendar and drove over to his house to retrieve him. After doing some mega-school-supply shopping and grabbing take-out dinner, we headed to the sewing room. I had some remnants on one table and pointed him there. They included fabric that I used to make a bedspread in the Tucson home where his parents lived when he was born. It was a nice solid buttery yellow upholstery fabric, sort of a ducky-lineny weave. Not interested. But a little further down in the stash was a piece I have had for years and can’t even remember where or when it joined my life. It is a floral tapestry print fabric like one would use for heavy draperies or to upholster a wing chair. The color palette is shades of green, teal, pink, rose, and a touch of pale aqua. I dug into a box of hand-dyed cotton and found a nice deep green/teal with touches of a lighter yellow/green.
First we measured the book. From front edge to back edge around the spine, it was 20″. From bottom edge to top edge, it was 10¼”. I wanted ½” seam allowances, and I wanted to topstitch close to the edge all the way around, so I added 1½” (¾” x 2) to the book measurements, giving me a rectangle of 21½” x 11¾”. I cut one rectangle out of the tapestry and one out of the hand-dyed cotton. Because of the width of the covers (probably about 9″ wide), I decided to make 4″ pockets—where you slip the edges to hold the cover onto the book.
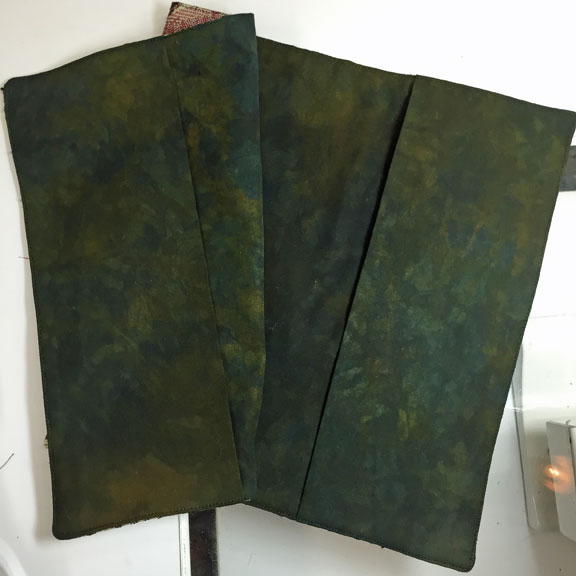 DGS felt the cover would be heavy enough without interfacing or fusible fleece, but I did interface the pocket to make it sturdier for keeping the cover on the book. I cut two rectangles 11¾” x 9″ ((4″ pocket + ½” seam allowance) x 2). I cut two 4″ x 10¼” rectangles of Pellon SF101, pressed the pockets in half to measure 11¾” x 4½”, then opened them up and centered the edge of the interfacing along one pressed edge, leaving the seam allowances uninterfaced. Then I positioned the two pressed pockets along either edge of the lining and DGS basted them in place with a ¼” seam allowance. Now we had a rectangle of tapestry and a rectangle of cotton (with pockets attached), which we pinned right sides together.
These were seamed leaving about 4″ open on one side—either the top or the bottom. I pressed the open edges back, matching the start and stop points of the seam so that they would be easy to sew together. Then he trimmed the seam allowances, holding the scissors at an angle to grade the seam allowances (not have too many layers stacked on top of each other) and clipped the corners. Because the tapestry was loosely woven, next he zigzagged along the edges except for the opening.
Time to turn it rightside-out and admire our handiwork. And his next question was the usual for our projects, “Grandma, where are the chopsticks?” It’s our favorite corner-turning tool. Before sewing the opening, we tried the cover on the textbook, and it was a bit snug. And the clock was striking 9:00, so I told him I’d finish it up on Thursday before his Friday deadline, and ran him home for a good night’s sleep before High School Day #2.
I fretted all night about the fact that I didn’t allow for any ease. It’s not a body. It doesn’t need an ease allowance, right? Wrong! After finished my work on Thursday, I turned it wrong side out again and moved the end seams out as much as I could, which was ⅛ to ¼” on either end. Then I redid the zigzag stitch in a couple of places.
To finish, turned it rightside out, pressed the heck out of it, pinned the prepressed opening and topstitched close to the edge of the opening from the edge of the left pocket to the edge of the right pocket. Then I topstitched the rest of the way around from where I had stopped on the opening to where I had started on the opening.
He had left his book in his locker on Thursday, so I couldn’t see the final fit, but I’m pretty sure it was fabulous.
My tasks: Design concept, math consultation, fabric cutting, final fixing.
His tasks: Fabric selection, all sewing except final fixing.
Shared tasks: Smiling.