


 Why, oh why, do I keep trying patterns no one has made before?! (Or at least no one has written a review or a blog post.) I must be a glutton for punishment, or else I’m emotionally bonded to my seam ripper!
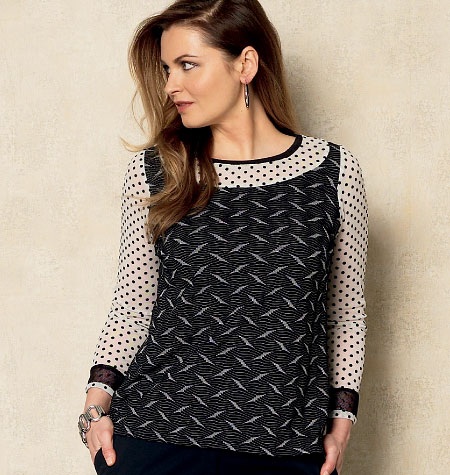
Today’s newbie pattern is Vogue 1363 in Sandra Betzina’s “Today’s Fit” line.
 I liked the layered look of View A. This has been my year of mixing prints, so I thought I would have some remnants that would work together with the Missoni-esque ITY fabric that I picked up at Vogue Fabrics’ booth at the Pittburgh Original Sewing & Quilt Expo.
Soooo, let me tell you about this pattern:
Pattern Description: MISSES’ TOP: Loose-fitting, pullover top has narrow hem. A: neck band, sleeve bands and insets.
Pattern Sizing: “Today’s Fit” by Sandra Betzina. Combinations: (A-B-C-D-E-F-G-H-I-J) All sizes in one envelope. I cut an E, cutting the shirt hem at the G line (basically adding an inch to the shirt length).
Did it look like the photo/drawing on the pattern envelope once you were done sewing with it? No, because of all my modifications.
Were the instructions easy to follow? Fairly easy, but I disagree with some of the methods used (with all due respect to Sandra Betzina, with whom I have studied and whom I admire).
What did you particularly like or dislike about the pattern?
Likes
- I’m busty. FBAs intimidate me. Sandra’s explanation was clear and easy and—for once—the bust fit exquisitely. (If you aren’t familiar with FBAs, and you make this pattern, pay more attention to the illustration than the text of the FBA instructions. Put your logical-thinking cap on, and you’ll be fine.)
- Edited on 2014/1/11: Linda C. in Phoenix called me out on this – see her thoughtful post below. (I deem it thoughtful because she was very kind in pointing out my ignorance!!) What Sandra does is a dart adjustment, not an FBA. For excellent discussions of various types of FBAs see Shams’s Busty Info section on her brilliant Communing With Fabric blog. Note, especially, her FBAs in Knits post. Thanks, Linda, for pointing out my misstatement.
- Another like that I haven’t tried yet: Sandra includes instructions for converting the shirt to a sleeveless version. Will definitely try this next spring.
- I liked the layered-look design. Had I chosen a different fabric for the inset, the design might have worked for me.
Dislikes
- Curved seam application of neck inset and neck band. No, no, no. DO NOT staystitch and clip. This is why we work with knits–they’re flexible. And especially if you’re working with a stable knit. The stay stitching is an unnecessary step, IMO. The clipping just weakens the seam. And if you’re using a mesh fabric, all those clips just give you a hot mess, both in the infrastructure and visually. But, most importantly, it weakens the seam.
- Several small pieces had ⅝” seams. I think it would have been easier to work with ¼” seams. Just my opinion. I think a neck binding, seamed at ¼”, or even a folded binding—stitched, wrapped, and top-stitched—would have worked much better.
Fabric Used: Missoni-esque ITY knit from Vogue Fabrics for the body, the yummiest “über-soft rayon jersey” from GorgeousFabrics.com for the sleeves, and a black “soft nylon mesh”, also from Gorgeous Fabrics, for the inset, but not used.
Pattern alterations or any design changes you made:
 The picture shows the neck with inset. The mesh was used for the inset. The pattern says seam, then serge or finish and trim off ⅜”, pressing the seam allowance toward the inset. But if you’re using a sheer, you can see that seam allowance. To my eye, this was not pretty. What if the body were solid and the inset was done out of any of these mesh knits Marcy offers or this or this from Ann Steeves’ Gorgeous Fabrics?
  With a mesh like that instead of what I used, you wouldn’t see the seam allowance. The issues I had with this neck and sleeve would have gone away. (But look what a beautiful job I did with the insertion!)
On the neck band, I didn’t want a super black ring around my neck, so didn’t think that wonderful black rayon that I used on the sleeves would work on the band. I tried making the band out of the mesh. #fail. I tried recutting the band to be deeper and cutting the existing inset shorter, so I would have about ½” of mesh showing and about 1½” of rayon knit for the band. #fail. Too much visible seam allowance. (VSA?) Too much messymessymess.
 Finally, after thinking and cogitating and scratching my head, I cut off the sleeve inset and band, and cut off the neck inset and band. I hemmed the sleeve with ½” turned hem, and left the neckline raw. There are so many topstitch lines and pseudoserger lines, you’ll never know it’s raw!
Would you sew it again? Would you recommend it to others? I do like the layered look, and will probably try it again, rethinking the neck finish, and absolutely choosing fabrics that are more appropriate. Will make View B for 10yo DGD, who should fit the size A perfectly.
Conclusion: I’ve been hearing about ITY for nine months and have been curious to try some. Now I have, and highly recommend it. Lovely to sew with.
And what to wear it with? I think I’ll try scrunching up the hem and putting it on top of black jeans and flats. Is it going in the suitcase to Europe in a month? Probably not. I think it will be going to the grocery store. (That is to say: I like it but I don’t love it.”)
Why the title “Guinea Pig Shirt”? Because I was the guinea pig to try making this shirt without having any one else’s experience to draw upon.
HI Jan, I think you can save this shirt – How about a vertical insert in the front? Ans some godets in the solid darker fabric on the sides? It would give it more vertical emphasis and movement. Loving you…even in a Guinea Pig Shirt! Diane
Liking these ideas, Diane! More later …
I have this pattern and have read the instructions back and forth and forth and back and no where do I see where Sandra talks about an FBA. I see where she talks about lowering and raising darts and eliminating them all together. Is that what you are talking about?
Linda, thank you for this. See my 1/11/2014 edit above.
Jan, you didn’t have to give me credit for noticing the dart movement on PR. 🙂 I have another question for you. Did you find the armhole to be long/low on this pattern? The sleeve cap and the armhole are considerable larger than the t-shirt pattern I usually make.
Linda, I don’t remember noticing the armhole to be out of the ordinary. But – to be completely honest here – I haven’t put the shirt on again! 😮 I must make another version, as I don’t love this one enough to put any more energy in it.
Will definitely blog it if I make another.
Thanks for your note.