


 I haven’t made much time to sew lately. Eight hours each week is taken up by chauffeuring my elder grandchild to her high school, 35 miles away. Preparing for and recovering from a yard sale ate up a couple of weeks. Having my car stolen and replacing it took another week. And I got stuck on a bag I was making for my [new] great-niece (the 30-something granddaughter of my newly discovered half-sister).
This is the third week I’ve devoted two hours each Wednesday afternoon to my younger granddaughter, Ridley. I pick her up from school and take her to the Jewish Community Center for a hip-hop dance class.  Esther, the daughter of my friend Ellen, is also in the class. This means Ellen and I get to chat for an hour while the girls, who are also friends, dance together.
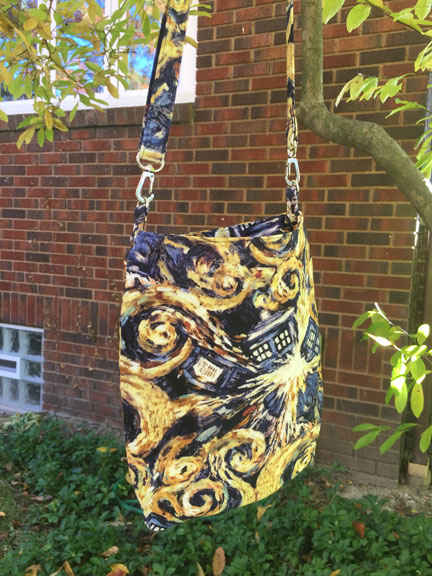
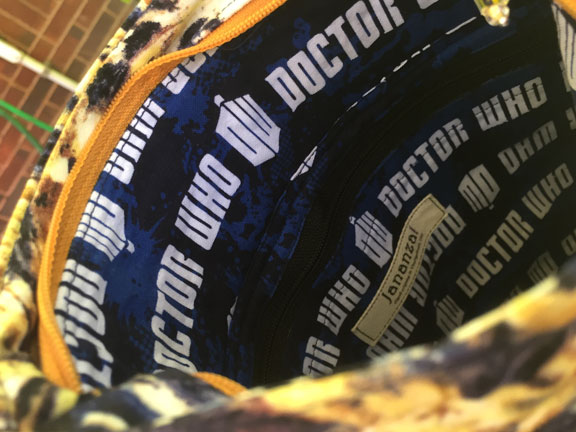
Ridley and Esther are both avid Doctor Who fans. Ridley carries everywhere with her the Doctor Who bag I made from the Swoon Ramona pattern. When Esther admired the bag the first time she saw it, I immediately opened my phone up to the eQuilter site and showed her all the Doctor Who fabrics in their catalog. She chose the Exploding Tardis print for the exterior and Calling the Doctor for the interior of the Ramona I promised to make for her.
So the topic of this sewing post is the Swoon Ramona bag. Note: This is a free pattern. If you’ve been intrigued by my posts about the Swoon bags I’ve made, here’s a great chance to try out one of these patterns at no cost.
 This is my third Ramona. I made the first for myself, out of a batik fabric I’ve been hoarding since 1997 or so. I made it while I was at Interlochen during the summer of 2015.
  The second was for Ridley, and she carries it everywhere and at all times. The fabrics I chose for her bag are from the same fabric line as the fabrics Esther chose—for Springs Creative, Villanous Characters for the exterior and Exterminate Daleks for the interior.
Both of those bags were pretty much exactly as specified in the pattern, with the exclusion of the diagonal stripes on the exterior. With this third bag I did a few hacks, and I love how it turned out.
The changes I made:
 First, in constructing the outer bag, I didn’t like how thin the bottom of the bag was. The pattern says to cut two of the Bottom Panel (the oval bottom of the bag) from the lining fabric and two from the SF101 interfacing. After I cut and fused these pieces, I didn’t like the look of the lining fabric used as the exterior base. So I cut a second Bottom Panel piece from the exterior fabric and the SF101, fusing them together. Now I had two interfaced Bottom Panel pieces, one in the interior (lining) fabric and one in the exterior fabric. I layered them with the exterior on the right side and quilted them together with an elliptical stitch. (Click on any photo to enlarge it and see the detail more clearly.) I love the look and I love the more substantial feel of this quilted bottom panel. (Note: I didn’t layer the bottoms of the interior, only the exterior.)
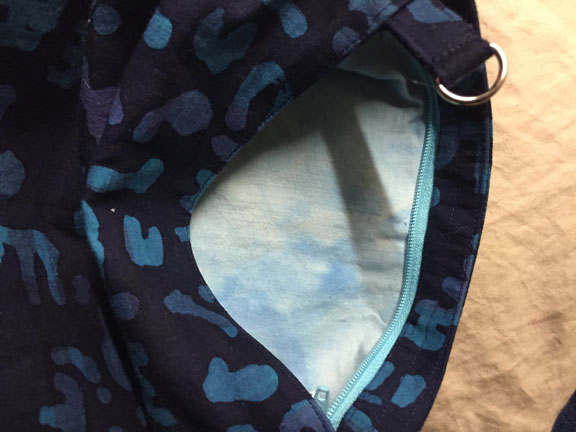
 Next, I wanted a more substantial bag than the others, so I used fusible foam interfacing along with the Pellon SF101 on the interior. I also wanted a zippered pocket on the inside, so cut a third Lining Bottom panel, a couple of inches shorter than the Lining Bottom panel pattern piece. I folded the cut top edge over about ⅜” and then folded it over again. I topstitched this folded edge onto one side of a zipper. I cut a 1″ strip of the lining fabric the same width as the “pocket” panel, turned each long edge under about ⅜” and topstitched this to the other side of the zipper. I aligned the pocket panel on top of the Lining Bottom panel and basted the side and bottom edges about ⅛” from the cut edges. Then I topstitched the top folded edge of the pocket to the Bottom Lining panel underneath it. These two pieces were then treated as one in continuing to construct the bag lining. (Clarification: I fused the SF101 to the Lining Bottom panel piece before deciding to add the foam. I cut a pattern piece from the foam, then trimmed ½” off each edge. I fused that onto the interfaced Lining Bottom panel, then fused yet another SF101 piece onto the Lining Bottom panel. So from the bottom of the sandwich I had: SF101, foam, SF101, fabric.)
 Another little personal touch comes from the new labels I had printed. “Jananza” is the name I use on my bags—this is what my new six-year-old granddaughter calls me. The second line of the label says, “Hand-crafted in Youngstown, Ohio.” This label was centered on the interior pocket, about an inch below the zipper. Note: The labels were created by Etsy vendor Mountain Street Arts. They are the small flat labels, style A.
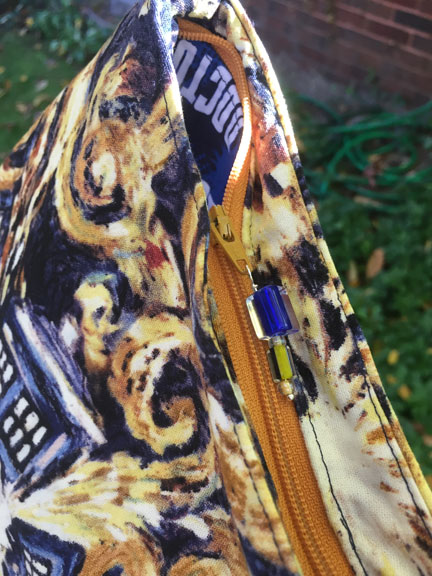 And the final touch was to wire-wrap two furnace glass beads on a long head pin and attach them to the two zipper pulls. Note: If you’re not familiar with furnace glass beads, here’s an eBay search to give you ideas.
One step I had never noticed in the previous two makes was to topstitch the zipper. How on earth have I read those pattern instructions as many times as I have and never see this step?!
 “Press all pieces away from the zipper (each Lining Top will be wrong sides together with Lining Bottom) and top stitch about 1/8” away from the seam through the Lining Top and Lining Bottom on both sides of the zipper.”
Now that I’ve seen the finished back with this topstitching in place, I realize how much that step adds to the stability of the bag. I’ll never skip that step again!
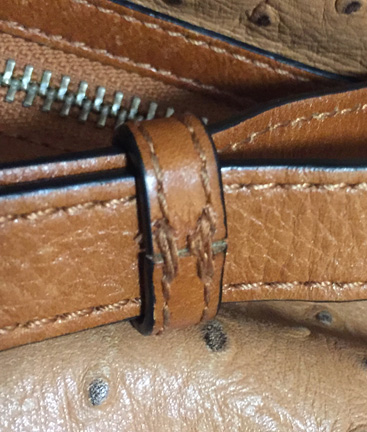
And one final note: The handbag I carry on a regular basis was designed by [Youngstown native] Nanette Lepore. As I was carrying this large bag crossbody today while slogging through Sam’s Club, I noticed the adjustable strap had a “strap loop,” much like a belt loop. It makes the adjustable strap easier to carry, with less chance of getting it inadvertently hooked on something you pass. (The photo only shows the back side of the loop. The pic of the front was blurred, and I refused to go back downstairs and reshoot it! The seam is on the back. It’s a 1.5″ or 2″ strip formed into a circle and handsewn.) I will definitely be adding a strap loop to the next adjustable strap I make.