A T-shirt Fit for a Gala

While we in the opera program at YSU’s Dana School of Music were preparing for our spring opera weekend, the program director, my boss Dr. Yun, asked if I would accompany the trio from Mozart’s “The Impresario” for an upcoming gala. The event was sponsored by YSU’s College of Creative Arts & Communication, of which Dana School of Music is a part. I put it on my calendar and promptly forgot about it.

The three weeks leading up to opera weekend are the busiest of the year for me. I don’t see my guy except when he’s sleeping and for five minutes in the morning before he leaves for work; I don’t do anything but make music and drive my high school carpool. I certainly don’t have time to sew. I asked Dr. Yun what we should wear for the gala performance, and her response scared me: “As fancy as possible.” Hmmm. I’m the epitome of simple—at least in my mind. I own a few dresses, street length, that I’ve worn before to a gala and to weddings, but I think I was five pounds lighter at each of those wearings. I couldn’t picture wearing them and being comfortable sitting on a piano bench. And I certainly didn’t have time to either shop or make anything.

What to do? What to do?

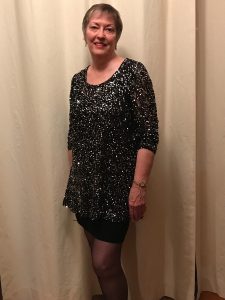
And I remembered a sequined piece of stretch lace that I bought at Fabrix in San Francisco while on a shopping jaunt with my fiberfriend, Shams, who blogs at “Communing with Fabric.” That trip was in September of 2014, and this fabric has been languishing in my stash ever since, calling “Make me, make me” everytime I opened its resting place. When Dr. Yun said “fancy,” I immediately thought of those sequins.
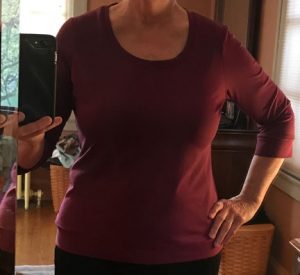
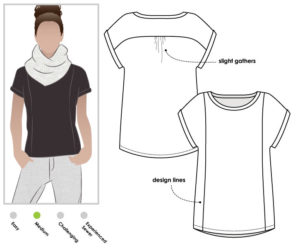
My TnT (Tried-and-True) t-shirt pattern has been getting a lot of attention from me lately. I could just grab that, cut, sew, and be done without taking too much time away from the piano.

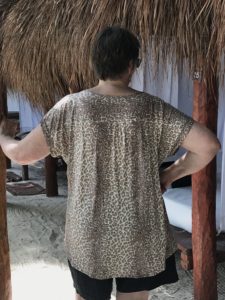
Round 1 for this pattern happened several years ago in a poly medium-weight jersey also from the 2014 trip to Fabrix. I made this and promptly forgot about it, never showing it on this blog. It’s very comfortable, but I prefer looser fitting tunics, as I’m in an unhappy-about-my-weight period. I try to disguise my belly as much as possible. I know what you’re saying: “Get over yourself!” During this weather-crazy spring, I’ve come to love this tee with black ponte elastic-waist EF slacks and a black Talbot’s no-close cardigan.
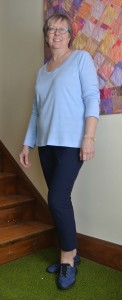
Round 2 went to a lightweight cotton knit with little stretch, made before my Interlochen summer of 2015. This version, without the hem and sleeve bands, has disappeared from my closet. I must have given it to someone who liked it more than I, or to a charity bin. I believe this pattern needs good stretch to look good on a body. This fabric wasn’t the answer.
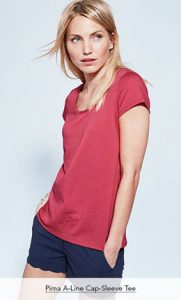
My attempt to hack this tee pattern began when I fell in love with two Garnet Hill tees I ordered for my aborted trip to Bali. I fell in love with everything about these tees. The fit was me. Folding my new tee at the center front, I laid it on the cutting table and laid the body front Renfrow pattern piece on top of it. I figured out that if I put the center front neckline point on the tee center front neckline, then pivoted the bottom side seam about to match the side seam of the tee, my bottom center front point was 1″ from the foldline of the tee. So that would be my hack. Pin the neck to the folded fabric, then pivot an inch out at the bottom, determine how long I wanted it to be and add that many inches all along the bottom and extending the side seam down that number of inches.
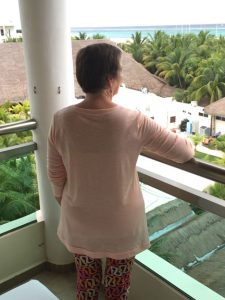
I had bought a pair of LulaRoe leggings from a friend who was in that biz and wanted a top to go with them for our winter Mexico vacation. I bought a piece of rayon/spandex slub jersey knit in peach from Hart’s Fabric and started the experiment. I decided to add 8″, which would include about a 1½” hem, so 5½” more than the Renfrew front pattern piece.

[Note: The Renfrew has a bottom band on the body and on the sleeves. So the length of the front piece I was using is not the actual length of the shirt. It’s the length less seam allowances less the band. If you’re attempting this hack, measure that pattern piece and compare it to your body or your favorite tee. How much longer do you want it be? How deep a hem do you want? Add the total of those two numbers to the bottom of the pattern piece when cutting. And also remember than your hem will not be a straight line perpendicular to the center front point. Let’s say you’re adding 8″, as I did. You’re going to lay your ruler along the side seam and continue that angled line down 8″. Then every couple of inches from that point across to the center front, you’re going to lay your ruler with the 8″ mark on the pattern bottom and make a mark. Once you’ve marked all the way along the bottom, you’ll cut along those marks from center front to side seam. That will give you a gently curved line which will result in a straight hem once the garment is on your body.]

While cutting out the top, I started thinking about how to wear it. Lace is seethrough and I’d need either a lining or something underneath it. I thought of lining the body, but not the sleeves, with a lightweight silk and cotton knit that I had just enough of. But if two fabrics don’t have exactly the same amount of stretch in them, the garment is never going to lie flat and smooth. So I turned to the email group I’m a part of; these sewists are all alumnae of the “Design Outside the Lines” retreats that Diane Ericson (formerly along with Marcy Tilton) leads. We’ve all studied with the same teachers and are all fearless when it comes to trying out techniques and learning as much as we can about fiber and fabrics. When I asked these women how they might approach this problem, several said I should make two separate garments—the sequined lace tee and an identical sleeveless tee from the black silk/cotton jersey to wear underneath. Grateful for their advice, I forged ahead with the lace, ignoring the lining need for the moment.

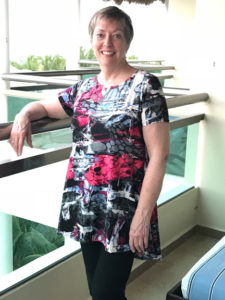
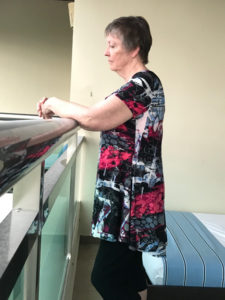
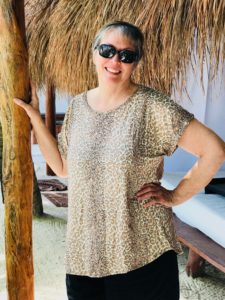
Sneaking fifteen minutes here and thirty minutes there, by Thursday afternoon of gala day, I had the long sleeves sewn to the armhole but hadn’t sewn the body and sleeve side seams or hemmed either. I threw the half-finished garment into my music bag and took it along to Dr. Yun’s 4:00 seminar, where I had to accompany my singer Olivia in her performance. I pulled the unfinished tee out of the bag and showed it to the two sopranos who would be performing that night. I felt it was way too bright and sparkly and would overshadow the singers—something one never wants to do. But they both said I should go for it. And then I showed it to Dr. Yun. She said I should finish it and let her wear it! So still skeptical, I raced home after seminar and finished the top at 6:00. I had to be at the hall where the gala was being held at 7:30. I had just enough time to wolf down some supper, changes clothes, add some make-up, and drive downtown.

I own numerous black tanks, many in a silk knit, that I wear under sweaters all winter long. Sorting through several of these, I picked one that was about the same length as the lace tee, and slipped an above-knee EF knit skirt under it, along with black sheer stockings and microfiber peep-toe slingbacks. For jewelry, I wore a pair of rhinestone drops that I bought along with a matching bracelet at a yard sale five years ago for $2.00.

From the moment I walked through the performers’ entrance to the hall, I started receiving compliments. And always I replied, “Thank you. I made it.” One of the servers said she’d like one. When I got home and told that to the Jazzman, he said I should offer to make her one for $275.

I’m writing this post on Sunday morning after the Thursday evening event, and I still smile every time I look at that picture.

I took a chance. I went wayyyyyyy outside my comfort zone. And I felt stunningly beautiful. I don’t think I’ve ever experienced that feeling before in my life.

Yea, me. And yea, Shams, for encouraging me to buy the fabric. And yea, Francesca, Becca, and Dr. Yun, for encouraging me to wear it even when every fiber of my being was saying, “Don’t you dare outshine the soprani.”

#win
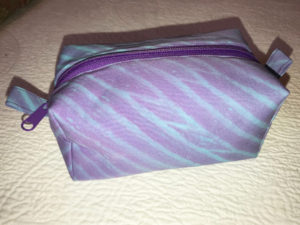
Three-Quarter Patch Tote from Craftsy

Shall we admit that I’m a pushover for a clearance sale? Even when I have a lot of fabric that is perfect for making a cute bag, I still follow the links in the Craftsy emails I get. Must get help to beat this addiction!

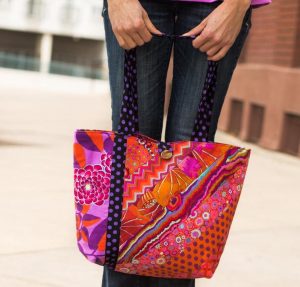
It’s opera season at the university where I work as a collaborative pianist. So my time is not my own. But last week we had a day off between final dress rehearsal and first performance. I grabbed that time, preceded by a couple of stolen hours on Easter weekend, to make the opportunity to sew. And waiting in the wings was the Three Quarter Patch Tote Kit I had snagged off Craftsy for a mere $13.20, plus shipping. I could not have bought the Kaffe Fassett fabric for that little, much less the fabric and a pattern.

I’ve made a lot of bags in the past couple of years, and once starting on this bag, I was glad I had the experience. With apologies to designer Pamela Hastings (with whose work I am unfamiliar), the instructions for this bag are not well written. The pattern is marked Intermediate experience level. But it’s a simple bag and could easily be a beginner bag if the instructions were clearer.

Before beginning the bag, I searched online for comments by other sewists. I read Sandra Walker’s pattern review on her blog, “Musings of a Menopausal Melon,” and was glad I did. Based on my skillset going into the project, Sandra’s notes, and my experience making this bag, here’s what I would amend in the instructions and in the sewing.

  1. The fabic is beautiful but thin. It seems not to be the standard quilting-weight cotton I’m used to, which surprised me. I enjoy Kaffe Fassett-designed fabrics and have since first seeing an exhibition of his work outside Stockholm in 2000. But this fabric needs interfacing if you’re making a bag that will be stuffed with your stuff and toted around. Pellon SF101 needs to be a staple in a bagmaker’s stash. I interfaced the lining pieces and the straps with SF101.
  2. The step about stitching the strips together wasn’t clear. If you look at Sandra Walker’s blog post, her picture makes it appear she sewed each set of two strips together on the short end so she had five long strips, then sewed those together on the long edges. I just made two sets of five strips sewing along the long edges. Then I cut one exterior panel on the diagonal from each of those. When I cut, I positioned the rectangles so one was at a 45° angle this way “/” and the other mirrored this way “\”. Looking at Sandra’s picture, she cut hers both the same way (which may have been necessitated by her sewing all the strips into one piece rather than my two pieces).
  3. After assembling the front and back exterior panels, I stitched-in-the-ditch on the diagonal strips, topstitched a couple of lines down the polka dot stripe, and then quilted the floral side strip, following Sandra Walker’s suggestion in her blog post. Honestly, that was my least favorite part. I remembered why I have a local long-arm quilter do the “dirty work” on any quilts I make: she enjoys that; I do not. If you enjoy the quilting process, knock ourself out. If not, just stitch a couple of vertical lines on that section to give the bag exterior more body.
  4. Do not cut out your lining pieces until completing the quilting step. “Square up” (Carefully measure the finished quilted front and back and use your plastic ruler and rotary cutter to make it a perfect rectangle. Then stack them right sides together and, if necessary, trim to make ensure they’re the same size.) your front and back, then use one as the pattern for the lining pieces. Sandra Walker had mentioned the lining was a little big for the bag, but I forgot that when making this bag. The lining is, indeed, big. Alas, I’m not going back to fix that!
  5. For the straps, I was glad I had read Sandra Walker’s post. As stated before, I interfaced with SF101. Then, after folding the straps as instructed, I cut two ¾” strips of a lightweight cotton batting and slipped in inside the folds. (To be clear: To make the strap, you fold the straps in half lengthwise and press, then open the strip and fold each long edge inward to meet the fold and press again. I then opened it and placed my batting strips next to the center fold on each strip, then refolding, pressing very well, and topstitching close to each long edge.
  6. Strap placement. The instructions tell you to measure 5″ in from either side on the top (long edge) of the exterior panels. But they don’t say where to position the straps on that—butt it to the right, butt it to the left, or center? Taking a clue from the polka dot stripe on the panel, I centered the straps on the 5″ mark. It’s a nit, but it makes the difference between a beginner level bag (as this should be) and an intermediate bag.
  7. I skipped the tab closure part. Years ago I started using elastic ponytail bands instead of fabric straps to hold tote bags closed. I like the give of the elastic when I’ve got an overstuffed bag (as mine always are). They come in a variety of colors at your corner drugstore.
  8. In steps 18 and 19 of the “Tote Assembly” section, the instructions tell you to box the corners of the bag. But they don’t tell you to trim off the excess. That’s a whole lot of excess fabric to have hanging around inside the bag. Step 19A should be to align the ¼” line on your plastic ruler with the stitching line from step 19, trimming off the excess triangle of fabric. Then zigzag the ¼” seam allowance. Do this also when boxing the lining. If you only have a straight-stitch machine, the zigzag finishing is not absolutely necessary, but it just gives you a nicer finish inside the bag and keeps the seam allowance from fraying.
  9. I had cut out all the pieces on Easter weekend and done the exterior panel stitching. When I got to my free sewing day on Thursday, I realized I hadn’t cut out the pocket pieces. If there was enough fabric left after cutting the lining pieces, I have no idea where I put it. So I took the scraps of the stitched strips and cut a diagonal rectangle and a vertical-pieced rectangle. There were not the prescribed size of the pocket, but I think they actually made a larger pocket than the pattern calls for. And they’re cute against the lining fabric. ☺
  10. My last modification would be to trim all the ½” seam allowances down to about ¼”. I didn’t do this. When I was topstitching the edge as the final step before applying Scotchgard®, I was wishing I had.
  11. Sometimes I make a reinforcement for the bottom to help it stand up. I measure the boxed bottom and cut a piece of plastic canvas to those dimensions. Then I take some of the excess fabric for the bag and make a little “pillowcase” for the plastic canvas rectangle, slipping the plastic inside the “pillowcase” and then edgestitching it closed. If I were going to use this bag on a regular basis, I would include that step. But I’m not in love with the bag, and am not sure how much I’m going to use it. Plus I just wanted to get it done and off my list. #badattitude

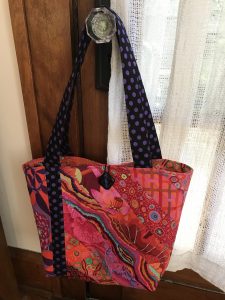
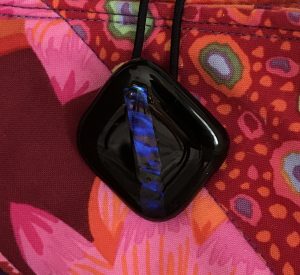
Pulled a cool fused-glass button out of my stash for this bag. I picked it up at one of the bead shows at the Tucson Gem & Mineral Show around 2004 and am thrilled to finally be able to use it.

The kit on Craftsy is sold out now. I don’t know if they’ll restock. Hancock’s of Paducah sells the Kaffe 2½” strips or you could make it using batik strips. Ooh, I’d love that even more than the Kaffe fabrics.

The pattern calls for ¼ yard of the large floral fabric for the 6″ side front piece; ¾ yard of the polka dot fabric for the handles and the exterior panel stripe; and ½ yard for the lining, plus two 18″ x 15½” pieces of fusible fleece.

I can’t find the pattern anywhere but Craftsy. But if you’ve made any bags before, you can probably intuit the pattern from this post and use Pamela’s technique for seaming the strips together to make the cool diagonal exterior panels.

Do look at Sandra Walker’s post and drool over her quilting. I wish I had her patience. Oh, and look at the cool travel iron. #want!

You’re only seeing this post this morning because I woke up at 5:30. On a Sunday! Of performance weekend! Argh!! Now I have to go play another opera performance and reclaim my life.

Winter = Resortwear

Let the record show that I wrote the first few sentences of this blog post on January 2, 2017. Today is March 1. Vacation and a Sondheim Revue at the local playhouse and two Saturdays of playing for auditions for incoming freshmen at Youngstown State University and preparations for the April YSU opera performances have kept me very busy.

So let me begin again:

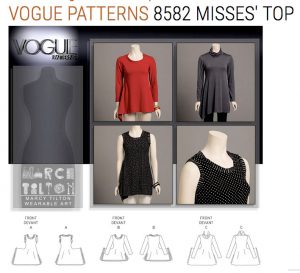
If you’ve read my posts around any vacation, you know that vacation for me means the necessity for new MeMade clothes. Tonight I finished the second piece that will go in my suitcase. So far I’ve done the Liberty top from the Sewing Workshop, and Marcy Tilton’s Vogue 8582, in my third make of that pattern. As soon as I sewed the final stitch, I cut out a third iteration of the Sewaholic Renfrew top.

I won’t write a full review of each of these makes, as that was two months ago. At mid-60s, my brain doesn’t hold details that long. I’m thankful for our ability to snap photos anytime and anywhere nowadays. Pictures are the great memory-jogger.

First make – Liberty

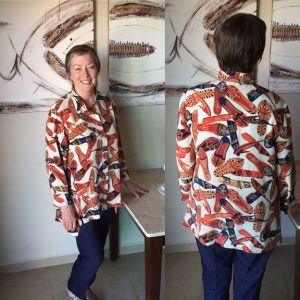
I love to pick up unique fabric when I travel—fabric that I’ve never seen in the States. On a trip to Rome in the early 2000s, maybe 2002, I quickly visited a fabric store on our last day in the city and was delighted with the shoe-print silk charmeuse I saw. The shoes look like little Persian slippers, what Anna and the King of Siam might have worn. The shades of rust and mustard and blue were wonderful together, and I grabbed a couple of metres. Fifteen years later, when digging through my stash, it called out for me to let it out of the stash so it could go on vacation with me. And to cut into a fabric so precious, I needed a tried-and-true (TNT) pattern—the Liberty Shirt from The Sewing Workshop.

A little over two years ago I made my first Liberty and loved it. Here’s that post. As I prepared the pattern for this make, there were two changes I wanted to make.

  1. Length. As I wear skinny pants most of the time (the years have been kind to my legs), I prefer longer tops. I had added 2″ to the length of Liberty the first time around. This time I added two more inches. I am very happy with the resulting look.
  2. Sleeve finish. The sleeves on this top are about full length with about a 2″ opening at the hem along the seam (the inside, toward the body), with no cuff. Meaning, if you reach across your dinner plate to pick up your roll from the bread plate, your sleeve opening picks up some marinara sauce to then drip across your shirt front and onto your pants. Everytime I have bought or made a shirt with such a sleeve finish, it has been faced and the opening was opposite the seam—on the outside of the sleeve, not the inside. I made a separate facing for the sleeve hem, made that design change, and I love it. I interfaced the facing and roll it up once. Perfect!

What do I wish I would have done? The silk is slippery to cut. I knew this. And I knew pinning it to tissue paper or examining table paper would resolve the problem. I didn’t pin. Learned my lesson!

Picked up a nice pair of slim navy ponte pants at Chico’s that work very well with this top and several others. The look is finished with my Naot Sara sandals in Silver Threads leather. If you don’t know Naot shoes, your feet will thank you to try a pair on. No break-in period. Put them on and walk across Europe without a single blister. Love. And even better, if the cork insole wears out, you can order a new insole for $30 or so. Makes their original price much more reasonable.

Second make – Vogue 8582

If you’ve read many of my sewing posts, you know I think the world of Marcy Tilton, as a teacher and mentor, as a designer, and as a friend. The garments and accessories she and her sister, Katherine, design are innovative and creative, and a joy to sew.

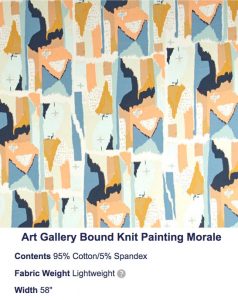
I usually buy a piece of fabric to coordinate with something that’s already in my wardrobe. I cannot now remember why I bought this piece. I love Art Gallery fabrics, and I loved the colors of this piece. It was on Cyber Monday sale at Hart’s Fabric in Santa Cruz, CA, a store with a great online presence. When it arrived and I pretreated the fabric by washing and drying, I was swooning over the hand of the fabric. Buttah! Soft as buttah! What better pattern to use? Another TNT: Marcy Tilton’s Vogue 8582. (First make; Second make; Third make; Fourth make; and Fifth make. So this is the sixth time I’ve made this top.)

The fabric is out of stock at Hart’s but you can find it at Fabric .com or on Etsy, or with a little skilled googling. Here’s how Fabric .com describes it: “Designed for Art Gallery Fabrics, this lightweight stretch cotton jersey knit is perfect for making t-shirts, loungewear, leggings, children’s apparel, knit dresses and more! It features a soft hand and about a 50% four way stretch for added comfort and ease. Colors include white, beige, gold, mint, coral and shades of blue.” Ooh, leggings out of this? Yes, please.

The pattern is out of print, but you can probably find a second-hand copy on Etsy or eBay. On this pattern, I never make the “waterfall” side. I am not a fan, so I choose the side of the front and back that doesn’t have the extension and just cut on the fold. With most Vogue patterns, I add 2″ to the length. They seem to be designed for ladies who are 5’6″, so my 5’8″ height makes me want a little more length.

Styled with a pair of cropped navy ponte leggings I got on sale at Talbot’s two summers ago, just before leaving for my summer as a collaborative pianist at Interlochen Arts Camp. The shoes are my the same Naot Saras as with the previous garment.

Third make – Sewaholic Renfrew Top

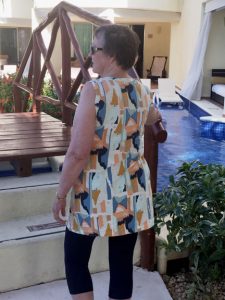
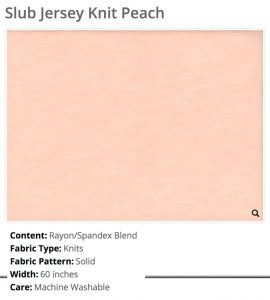
A friend of mine has started selling LuLaRoe clothing, and I try to help out my friends when they begin ventures such as this. So I bought a pair of leggings way out of my normal style comfort zone. I wanted a top to go with it, but was having a hard time finding the exact pale coral shade I wanted. When I received this peach cotton jersey knit from Hart’s Fabric (on Cyber Monday sale), I was thrilled. The color was perfect and the fabric easy to work with. Here’s how Hart’s describes it: “This lightweight jersey knit slub in peach is subtly sheer with a good stretch. It would make excellent infinity scarves or cardigans. Even a light tank top!”

As you can see from the photos, it’s a very sheer fabric. I wear a long off-white tank under it. Honestly, if I were to make a tank top out of this fabric, it would have to be a double layer. A single layer of this fabric without a tank under it would be far too revealing.

I have a favorite t-shirt that I purchased from Garnet Hill before last summer’s vacation, and after my first Sewaholic Renfrew top, I realized that pattern was the perfect design to modify in trying to reproduce the Garnet Hill top. I made my second Renfrew with the changes for that make, but evidently didn’t write a blog post. For this peach top, I used the same pattern modifications and cut it about three inches longer.

I laid the top front pattern piece on the fold, with the neckline center front right on the fabric fold. Then the hem center front was inset 1″ from the fold. For the first one I made, I cut the hem 2″ or 3″ longer. Then this one was cut another 3″ longer than that. Maybe even longer. Remember what I said about not being able to remember the details?! Anyway, it’s a length I like with leggings, so I don’t look like I’m trying to be a teenager again. And it doesn’t reveal any part of my anatomy that I’d rather keep hidden.


All the pictures were taken at the wonderful all-inclusive resort, El Dorado Maroma, in Quintana Roo, Mexico. We loved our vacation, and will go again at the next opportunity. Here’s that blog post, if you’re interested.

Beauty everywhere

Sweetpea Pods

img_3913I’m having a special party on Sunday. My new-to-me sister is coming to Ohio for Christmas with her granddaughter. My children, grandchildren, and our circle of friends are gathering at my home to meet my sister, her eldest daughter, and her younger daughter’s daughter and son-in-law.

When any of our friends has a party, everyone brings food. As I am not a cook, I am filled with gratitude to these friends for making the party doable for me. To thank them for all this work, I wanted to make a little gift for each of the ladies to take home.

Thanksgiving a year ago, I made a bunch of Bendy Bags (designed by Lazy Girl Designs), and then at Christmas last year, a couple more. I love these bags and carry one in my music “toolbag,” but they take a couple of hours to make. I needed something a little quicker to make.

Earlier this year I made two “Tulip” bags, a design from CloBird Designs. The most valuable technique I learned from those bags was the half-zip installation.

img_3914The thing about the Bendy Bag is there’s some waste—like two triangles that, together, would equal a 10″ square of fabric, already bonded to fleece. Hmmm. What does one do with all those valuable triangles? Joan Hawley may be a Lazy Girl, but she’s no dummy girl. She designed the Sweetpea Pod pattern, which deftly uses up all those extra triangles of fabric. And I was happy to see the pattern used the half-zip technique.

img_3912Honestly, these little pods are genius. Think of all the uses! If there are any leftovers after Sunday’s party, I’m going to snag one to hold earbuds in my purse. It could easily be made with a hook to attach to your keyring. Put your driver’s license, a $10 bill, and a lipstick in the pod, and you’re good to go.

I’ve been having lots of fun making pulls for the zipper tab. I bought some furnace glass beads on eBay a while back, and one of those on a headpin is very easy to wire-wrap onto the tab. And in their jewelry-making department, Jo-Ann’s has cute “Handmade” charms which are easy to attach with a jump ring. So even when I make several bags from the same fabric, each one is different. I love that!

I hope my guests on Sunday love these bags as much as I do.

The 5,000-Mile Bag

tulipsquareTwo days in a row with time for sewing—yea! [Or, as my sons tell me I should say—yay!] Yesterday I finished the Swoon “Ramona” crossbody bag. Today I finished a CloBird Designs “Tulip” bag.

tulipfullThis is my second Tulip and it was made for a special lady. My new sister’s granddaughter is a missionary in Kosovo. When I sent my sister a picture of the Tulip I made for myself, she said, “That’s just the type of bag that Jennifer has been looking for.” So, of course, I immediately started to think about making one for Jen.

I have only met Jen via Skype, but I follow her posts on Facebook and we text occasionally. She gives of herself completely to the people she ministers to in Malisheve, Kosovo. She is always looking for ways to help the single mothers there find ways to bring in some household income with items they have crafted with their own hands. She gives them dignity and hope. I don’t know her personally, but I see the photos showing her smiling face and see the love she shares with the women and children she helps.

I don’t remember whether I asked Jen or my sister what colors Jen might like for her bag, but I remember hearing navy and brown and conservative colors. I dug through my stash and settled on a blue/navy color scheme.

Front pockets

Front pockets

For the body, I first chose the same navy cotton duck that I used for the Swoon Vivian carry-on bag, blogged here. For the contrast fabric that is used for the exterior slip pockets, I chose a silvery blue and navy geometric print that was destashed by a close friend and sent to live with me. For the lining, I gravitated to the Cotton+Steel Butterflies of Blue, designed by Rashida Coleman-Hale.

Back pocket

Back pocket

Once I got into the construction of the bag with those three fabric choices, it just wasn’t speaking to me. The navy cotton duck was a dull shade and—to my eye—just didn’t blend with the other two fabrics.

Digging through my stash, I found the blue with gold fleck cork fabric from Sew Da Kine‘s Facebook store. I had been looking forward to sewing up this cork fabric, and now that the bag is done, I want to make more cork bags. Like buttah!!!

Zipper pull with African trade beads

Zipper pull with African trade beads

What did I learn new with this bag and its predecessor? I’ve never before made a bag with a half-zip installation. Now I understand how some of my RTW bags were made. This is a very cool technique, and I’m so glad I discovered it on this bag.

Inside pocket

Inside pocket

What did I change? I added a little pocket inside to hold business cards or credit cards or driver’s license.

What little extra touch did I add? Look at that zipper pull with African trade beads. One of the things I miss about living in Tucson is the treats one can find each year at the Tucson Gem & Mineral Show.

Adjustable strap and swivel hook

Adjustable strap and swivel hook

Where did I have trouble? The adjustable strap. I posted on a couple of FB bag groups asking how people did their straps with cork. The answer I got was to just do it like one does the fabric strap—cut 4″ wide and x” long; fold in half lengthwise and press; fold both sides in to the center and press; edgestitch both long sides at ⅛”. I did that and was very unhappy with the result. So I picked out all the edgestitching and cut the strap so I had two 1″ wide strips. tulipinteriorI placed them wrong sides together and edgestitched. I daubed Edge Cote onto the cut edges. Amazon link for Edge Cote And again I didn’t like it. The stitching and unstitching and restitching left it stretched out and curling. So I dug into my stash and found another vintage fabric in shades of blue that went well with the existing fabric combo. Using the standard technique just described, I ended up with a perfect adjustable strap. Now we’re happy.

On Wednesday I’ll box it up, go to the post office, fill out customs forms, and send it on its way. I hope Jen loves it.

Tulip number one, memories of Interlochen

Tulip number one, memories of Interlochen

As I was preparing this post, I realized that I had never written a blog post about the first Tulip I made. The fabric on #1 was purchased at Interquilten in Interlochen, Michigan. Interquilten is located two miles from my beloved Interlochen Center for the Arts, where my younger son went to camp and high school, where I worked one summer as a collaborative pianist, and where my grandchildren now go in the summer to study art and creative writing. The fabrics reminded me of the Petosky stones in Lake Michigan and Grand Traverse Bay and of the pine needles carpeting all the wooded areas. That part of the world owns my heart.

Would you like to get one of CloBird’s patterns? They’re available on Craftsy.

The Third Time is the Charm

Ramona OutsideI haven’t made much time to sew lately. Eight hours each week is taken up by chauffeuring my elder grandchild to her high school, 35 miles away. Preparing for and recovering from a yard sale ate up a couple of weeks. Having my car stolen and replacing it took another week. And I got stuck on a bag I was making for my [new] great-niece (the 30-something granddaughter of my newly discovered half-sister).

This is the third week I’ve devoted two hours each Wednesday afternoon to my younger granddaughter, Ridley. I pick her up from school and take her to the Jewish Community Center for a hip-hop dance class. estherfabricEsther, the daughter of my friend Ellen, is also in the class. This means Ellen and I get to chat for an hour while the girls, who are also friends, dance together.

Ridley and Esther are both avid Doctor Who fans. Ridley carries everywhere with her the Doctor Who bag I made from the Swoon Ramona pattern. When Esther admired the bag the first time she saw it, I immediately opened my phone up to the eQuilter site and showed her all the Doctor Who fabrics in their catalog. She chose the Exploding Tardis print for the exterior and Calling the Doctor for the interior of the Ramona I promised to make for her.

So the topic of this sewing post is the Swoon Ramona bag. Note: This is a free pattern. If you’ve been intrigued by my posts about the Swoon bags I’ve made, here’s a great chance to try out one of these patterns at no cost.

Swoon RamonaThis is my third Ramona. I made the first for myself, out of a batik fabric I’ve been hoarding since 1997 or so. I made it while I was at Interlochen during the summer of 2015. Ridley's SwoonThe second was for Ridley, and she carries it everywhere and at all times. The fabrics I chose for her bag are from the same fabric line as the fabrics Esther chose—for Springs Creative, Villanous Characters for the exterior and Exterminate Daleks for the interior.

Both of those bags were pretty much exactly as specified in the pattern, with the exclusion of the diagonal stripes on the exterior. With this third bag I did a few hacks, and I love how it turned out.

The changes I made:

Ramona BaseFirst, in constructing the outer bag, I didn’t like how thin the bottom of the bag was. The pattern says to cut two of the Bottom Panel (the oval bottom of the bag) from the lining fabric and two from the SF101 interfacing. After I cut and fused these pieces, I didn’t like the look of the lining fabric used as the exterior base. So I cut a second Bottom Panel piece from the exterior fabric and the SF101, fusing them together. Now I had two interfaced Bottom Panel pieces, one in the interior (lining) fabric and one in the exterior fabric. I layered them with the exterior on the right side and quilted them together with an elliptical stitch. (Click on any photo to enlarge it and see the detail more clearly.) I love the look and I love the more substantial feel of this quilted bottom panel. (Note: I didn’t layer the bottoms of the interior, only the exterior.)

Ramona pocket and zipper pullNext, I wanted a more substantial bag than the others, so I used fusible foam interfacing along with the Pellon SF101 on the interior. I also wanted a zippered pocket on the inside, so cut a third Lining Bottom panel, a couple of inches shorter than the Lining Bottom panel pattern piece. I folded the cut top edge over about ⅜” and then folded it over again. I topstitched this folded edge onto one side of a zipper. I cut a 1″ strip of the lining fabric the same width as the “pocket” panel, turned each long edge under about ⅜” and topstitched this to the other side of the zipper. I aligned the pocket panel on top of the Lining Bottom panel and basted the side and bottom edges about ⅛” from the cut edges. Then I topstitched the top folded edge of the pocket to the Bottom Lining panel underneath it. These two pieces were then treated as one in continuing to construct the bag lining. (Clarification: I fused the SF101 to the Lining Bottom panel piece before deciding to add the foam. I cut a pattern piece from the foam, then trimmed ½” off each edge. I fused that onto the interfaced Lining Bottom panel, then fused yet another SF101 piece onto the Lining Bottom panel. So from the bottom of the sandwich I had: SF101, foam, SF101, fabric.)

Ramona labelAnother little personal touch comes from the new labels I had printed. “Jananza” is the name I use on my bags—this is what my new six-year-old granddaughter calls me. The second line of the label says, “Hand-crafted in Youngstown, Ohio.” This label was centered on the interior pocket, about an inch below the zipper. Note: The labels were created by Etsy vendor Mountain Street Arts. They are the small flat labels, style A.

Exterior zipper and pullAnd the final touch was to wire-wrap two furnace glass beads on a long head pin and attach them to the two zipper pulls. Note: If you’re not familiar with furnace glass beads, here’s an eBay search to give you ideas.

One step I had never noticed in the previous two makes was to topstitch the zipper. How on earth have I read those pattern instructions as many times as I have and never see this step?!

Strap loop     “Press all pieces away from the zipper (each Lining Top will be wrong sides together with Lining Bottom) and top stitch about 1/8” away from the seam through the Lining Top and Lining Bottom on both sides of the zipper.”

Now that I’ve seen the finished back with this topstitching in place, I realize how much that step adds to the stability of the bag. I’ll never skip that step again!

And one final note: The handbag I carry on a regular basis was designed by [Youngstown native] Nanette Lepore. As I was carrying this large bag crossbody today while slogging through Sam’s Club, I noticed the adjustable strap had a “strap loop,” much like a belt loop. It makes the adjustable strap easier to carry, with less chance of getting it inadvertently hooked on something you pass. (The photo only shows the back side of the loop. The pic of the front was blurred, and I refused to go back downstairs and reshoot it! The seam is on the back. It’s a 1.5″ or 2″ strip formed into a circle and handsewn.) I will definitely be adding a strap loop to the next adjustable strap I make.

My New Favorite Spot

IMG_3456I used to say the library in our house was my favorite place. It had the fewest hand-me-downs of any room, and had original art pieces hanging on the wall. Colors were coordinated; the feel in the room was of peace. Then we got an elliptical machine, which our bodies needed. But the peace and calm of the library was replaced by activity and the noise of a television to keep exercisers motivated.

A couple of summers ago we bought two window air conditioners. One was for use in the upstairs bedroom that we use as our TV/family room, the other was for our bedroom. The problem was there is a 2nd floor hallway that connects the two rooms to the bathroom. The door to the room that had the a/c running had to be kept closed. And at night, if we were running the a/c in our bedroom, Angel would stand outside and “knock” on the door with his paw until I got up and let him in. And then got up again to let him back out. (I sleep closest to the door, so of course it’s my job. And I am the one who adopted him.)

imageOne day this summer when the temperature was hovering around 96°, I had a bright idea. A very bright idea. I asked Jas what would happen if we hung a curtain at the edge of the hallway, where the stairs go down to the landing and turn to go the rest of the way down to the 1st floor. I wondered aloud if it would be possible to trap the cool air on the 2nd floor and not keep the bedroom door closed all night.

(My motive wasn’t just to give Angel access at will. When I get up to go to the bathroom in the middle of the night, it would be nice not to be shocked by the hot air in the hall.)

imageSo after batting ideas around for several weeks, I started shopping. I measured the space between the two parallel walls in the hallway and came up with 96″. I measured the floor to the ceiling and came up with [something]. Then I went to Lowe’s and found a 96″ closet rod. I couldn’t find a curtain or even two matching curtains that would span the dimensions we needed, so I went to JoAnn’s. I wanted a tightly woven fabric that would keep the cool air trapped. I looked for a curtain ring that clips onto the curtain panel, but could find nothing that would fit the 1.25″ diameter rod. I looked at grommets and, although I thought the plastic looked kinda cheesy, I didn’t think anyone would be standing 4″ from them, trying to determine if they were metal or plastic. The grommets came in two sizes and three finishes, and the 1.56″ was perfect. Then I found cotton duck in an ecru shade, spent a minute or two with my iPhone calculator, and bought the fabric.

imageLooking at the grommets, I was scared I was going to need heavy duty equipment to attach them to the fabric panels, but once I got the two panels constructed – cut the full width of the fabric, leaving the selvedge as is (4″ hems with ½” turned under; two panels to cover the entire span) – and started reading the grommet instructions, marking, cutting and clicking in place with the palm of my hand, I was doing a major Happy Dance! These grommets are easy, even when attaching them to two layers of thick fabric.

Then we were ready for the hanging.

We held the rod in place and realized the space was wider than I thought. My brilliant handyman cut a spacer to make the rod just the right length for the space. The length was a fraction too short, but we made sure the bottom of the drape touched the floor and any gap was at the top. Y’know the old thing about heat rising?

imageThen we pulled the drape across and turned on both air conditioning units. Yesssss! The scheme is brilliant.

imageI shuffled around a couple of quilts, and folded over the railing a quilt I made for my younger son during his junior year of college. Monochromatics always feel restful to me, and this quilt in creams, beiges and browns against the ecru drape just pleases me. Every time I’m climbing the stairs and I take the 90° turn to finish the climb, I look at that display and smile.

It’s my new happy place.

Just in case you’d like a better look at the quilt, here it is after ex-DIL had shoved it away in a plastic bin in the attic for years. This photo was taken 18 months ago – I found it after weeks of searching, washed it, and hung it out in the glorious spring weather. Oh, and the binding is white musical notes on a cream background. Love it. Jiggety jig.

A Second Bag to Meet My Needs

Alice2frontA year ago I had started a new job and was overwhelmed carrying my iPad plus binders of music back and forth from home to school. I made a Swoon Patterns “Alice” bag out of music-themed fabric to keep everything together and manageable.

Sidenote: As I was pulling the Swoon link for “Alice,” I noticed it was a free pattern. If you’re thinking a bag like this would be fun to make, here’s a great way to start Swooning. There’s a private Facebook group you’ll want to join, as Swooners are really nice people and sewists who like to share their knowledge and excitement. You’re welcome.

Alice2frontpocketWhen I made my first musical “Alice,” I was three months into playing from an iPad. I use the ForScore app and was finding it very easy to manage all the repertoire for several voice students, plus the Opera Workshop class I accompanied, plus the opera chorus and the Young Artists program of Opera Western Reserve. Alice seemed to be the perfect bag. (The other benefit of playing from an iPad and using the AirTurn pedal is I no longer need a pageturner. My left foot controls the page turns. Very cool!)

I followed the instructions closely and was pleased with the result. (Here’s my post for Musical Alice I.) However, once I loaded it with all my needs, the first problem was the stitches on the diagonal handles starting to pop. The second problem was that the increased seam allowances on the lining—to encourage the lining not to pop out—caused the top of the bag not to lie flat, but rather to pull severely to the inside. I knew if I ever made the bag again I would just use ½” seam allowances all around.

Two days before the end of the spring semester, I was walking to class with all my gear when the handle broke free from the side seam. At that instant, plans for a new bag began.

I had a Alice2Melangecool subtle musical/French fabric called Melange (Westminster Fabrics, Eclectic Elements, designed by Tim Holtz).

Alice2baseA road trip to Tandy Leather in Cleveland yielded some pieces of leather on sale. One of those, in a taupe-y shade, was perfect for the base and handles.

To supplement the Melange and leather, I dug into my stash of hand-dyed quilting cottons, which I’ve collected since around 2000. While living in Tucson, I bought gorgeous hand-dyes from Desert Dyeworks (who appears not to be making and selling them any more, but one can always hope …) and from Janet A. Smith, who had a website at textileart(dot)com. Alas, that site is now inactive, and I can’t find out anything about Janet A. Smith, as I’d love to own more of her beautiful work. But …, I did find a Janet Jo Smith, who is also a hand-dyer. Her work appears to be just as beautiful as Janet A.’s was. Check out DyeSmithy.

Alice2pocketlabelIn my TextileArt hand-dyes stash, I had a gradation of greens that went beautifully with the Melange. I used it for the outside pocket, the inside pocket, and the inside and base panels. I believe I used three different shades from the gradation. I love it.

Okay, my oopses, to give you a few giggles:
1) When inserting the exterior pocket, I was so concerned with making sure the size was going to fit between where I wanted the straps/handles, that I forgot to edge-stitch the bottom curve of the opening before finishing the pocket. I found a cherished piece of hand-dyed embroidery floss in a lush shade of copper and hand sewed the edge-stitching—¼” down from the finished edge of the opening, ¼” stitches with ¼” between the stitches. It was a happy fix for me. (Click on the second picture above where you see the straps and the pocket opening. That will enlarge the picture so you can see the hand edge-stitching.)

The Alice pattern illustration for finishing the exterior pocket clearly shows the top curves.

The Alice pattern illustration for finishing the exterior pocket clearly shows the top curves.

2) I wanted vertical straps supporting the handles to give more stability to my weighty contents. I positioned the straps in the center of the curve along the top edge of the bag. When the exterior bottom and side panels were attached to the front and back panels, the straps were caught in those seams.
3) When sewing the curves on the exterior bottom, I accidentally had part of the seam allowance of the leather base tuck under and I sewed through it. If you haven’t sewn on leather yet, let me warn you—those needle holes never close up. (Thank you, Photoshop, for letting me hide the holes on the photographs.

Only three oopses, and one “I’m thrilled out of my mind”:
Alice2stitchingA local quilt store (LQS) in Warren, OH, went out of business recently. As the owner was liquidating all the contents of the store, I picked up a new sewing machine. (That would be #4 in my inventory.) I told her I was having trouble getting my 20yo Bernina 1630 to do the edgestitching on bags, which requires even stitches through between four and eight layers of fabric. She said the Elna 720 eXcellence she was selling from her classroom was the perfect machine for my needs.

Alice2strapmusicThe closer I got to the last steps in finishing the bag, the more excited I was about trying the Elna on the top edge. Hoo boy!!!! Am I a happy sewist?! Yes!! That Elna ran the needle right through all those layers as if they were butter. Of all the bags I’ve made over the past ten years, this is the best finishing edgestitch I’ve ever gotten.

Alice2strapI’m over the moon!!

And as one more sidenote, machine #5 joined my little family yesterday. A local woman (who also happens to be a musician and who has a daughter pursuing a master’s degree in French horn at the university where I work) was downsizing and selling her grandmother’s Singer Model 201. Her mother had made all her own coats and dresses on this machine, which several websites tout as the workhorse of the Singer line. It dates from around 1950 (a good year), and is now visiting the sewing machine hospital in Warren to get a full check-up. What I hear from the Facebook group I’m in of Swoon Bag aficionados is that these old machines—long pre-dating all the computer stuff that’s in the new machines—are unflinching when it comes to top-stitching. Can’t wait to bring it home and try it out.

I’ve enjoyed these last few sews. Does summer really have to end and school begin again??