 (Woke up with a medium-sized headache, and lay in bed with my iPad surfing sewing and knitting blogs.) Boy, can I chew up a lot of time on the Internet reading what other people are doing and creating?! So let me tell you about my latest creation…
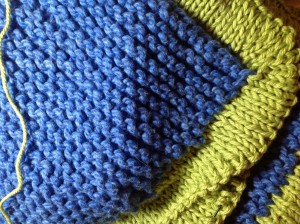
For our vacation last week, I chose the Spud & Chloe Bulky Baby Blanket. The colors I chose were Wave for the Outer and Grass for the Sweater. I opted for the garter stitch version, as I’ve been asked by several people if I could teach them to sew, and I think garter stitch is the place to start.
The Outer yarn is soft and cushy and wonderful. But before I discovered that, I started with the Sweater yarn. Follow your guts, people. If it seems to you like something’s wrong, it probably is!
I had knitted a couple of cotton washcloths on the trip, so was in knitting mode and anxious to get started as we headed from Portland to Boothbay Harbor. I reached into the Jimmy Beans bag and pulled out a hank of yarn, balancing it around by knees to wind it into a ball. I didn’t think. I didn’t look. I just did! Mistake!! My lovely ball of lime worsted weight wool/cotton was ready to go, and so was I. I pulled out my size 15 circs and started casting on. I knit about 6 rows, and thought, “This isn’t right. I must have cast on too loosely.” So I unknitted the whole thing and tried again. Crap. Same result. Over the next two days I picked it up and added a few more stitches. “It must be the needles,” I thought. I really don’t like bamboo needles.
As I mentioned in the trip post, I made a new friend who suggested insisted I visit Halcyon Yarn in Bath, ME. I walked in and asked the helpful salesclerk if she had any Addi 15 circs. “My bamboos just aren’t working for this project.” She didn’t have Addis but had Knitter’s Pride interchangeables which I happily took off her hands – both 15s and 13s and a 40″ cable.
Back in the car, the Jazzman drove toward Freeport and I quickly pulled out and assembled the 15s and started casting on. Again I knit several inches before thinking there must be something wrong with the pattern or the yarn. (Certainly not the knitter. God forbid!!) I reached into my bag to pull out the size 13 needles. Maybe if I used the smaller needle the gauge would correct itself. As I blindly felt around in the bag for the other needles, my hand touched the soft and cushy Outer yarn. The yarn for the blanket itself, not the yarn for the edging. Huh?
I pulled the bag into my lap and pulled each item out, mentally cursing my stupidity. The blanket is knit with Bulky weight yarn on 15s. The edging is knit with two strands of Worsted weight yarn on 13s. Dumb. Dumb. Dumb!
Extracting the needle from my third try with the Sweater, and opening the first hank of Outer, I frogged the Sweater and rolled it back into a ball, then balanced the Outer on my knees and rolled that ball. I cast the Outer onto the 15s and began knitting. Like buttah. Like lightning!!!
I added a few rows to the blanket over our two days in Massachusetts, then whipped through the other three hanks with only about six rows left to knit by the time we reached home on Saturday evening. The next morning, between trips to the basement to do the vacation laundry, I finished the Outer, changed needles, and started the stockinette stitch border.
I had never knit a border like this in my limited knitting life (Limited, relative to every other knitter I know.) I wasn’t really sure where it was going until I finished the purl row and the succeeding knit row and then started trying to logic it out. Aha! You fold at the purl row and knit the edges together. Brilliant!
But, again, something didn’t feel quite right. At this point I had finished nine of the ten rows that comprise the border (each row has no fewer than 240 stitches). I looked back at the instructions and realized the increase rows said “k1, make 1 right …, make 1 left, [repeat four times]”. Repeat the k1 four times also, Dummy, not just the make 1s! The mitered corners that should have been beautiful were a knitted mess. Sad face. Very sad face!
So I put on a two hour movie and started frogging. Yes, I could have taken the needles out and just started over from scratch, but I thought this was better, not realizing I was going back to the first row after the picked-up stitches around the edge. Ho hum. (By now you’re saying, “This girl has a lot fewer brains than I credited her with.”)
So, as I was saying, I pulled out each of the double-strand stitches, keeping the strands together and letting them pool in the “cup” created by the circular needle around the edge.
Two hours and more than 2000 stitches later, I began row two again. Friday night, the Jazzman out drinking with his buds, I watched crap TV and knitted the stockinette border. I noticed my yarn dwindling. And when I got to about the 170th stitch of the bind-off, I realized I was out of yarn.
Pulling the doubled Sweater yarn from the cup of spaghetti in my lap, rather than having rolled it all back into two separate balls before restarting the border, made for a looser knit. And made me run our of yarn about 3 yards too soon.
Extreme feeling of despondency.
This is not cheap yarn. The yarn alone for the blanket was [please don’t tell anyone that I spent that much on a project just to satisfy my own curiosity and keep myself from being bored on vacation!!!] I would now spend another $17+ for a hank of yarn to knit about 70 stitches.
Thankful feelings for books like “One Skein Wonders.” And a second thankful feeling that lime is my favorite color, and I’ll have about 157 yards of this lovely superwash wool to play with. Maybe I can even take it on my November trip to Europe as an antiboredom project.
Orrrr, I could buy four more hanks of Outer and one more hank of Sweater and do it correctly, from the start, this time!


