Yummy, Yummy, Yummy …

redsoftI’ve got love in my tummy for this fabulous fabric. (Maybe one has to be born in the 50s to know that song.)

When’s the last time you made something you loved so much you couldn’t wait to finish it before wearing it? That was yesterday for me! Ann Steeves had a knit sale this weekend. (If you’re reading this on Sunday afternoon, Oct. 13, runrunrun to GorgeousFabrics.com where the sale’s still on.)

redsoftdescI picked up some of this poly/rayon/lycra blend from Gorgeous Fabrics last week, and it is to swoon over! Every time I put my hands on it to pin a seam or run that seam under the presser foot, I can’t wait to finish and wear it. Our traveling buddies called last night to see if we wanted to go out to dinner and, before the final pattern piece of Katherine Tilton’s Butterick 5925 was in place and before any hems were sewn, I threw the top on over a pair of Eileen Fisher stretch crepe black slacks and adorned the V-neck with a great necklace I picked up in Paris in May, running out the door in glee. (And very disturbed to learn I didn’t document in my travel blog the store where I found the necklace – must find that store again!!)

Anyway – get some of this fabric while you can. It’s just fabulous. I’ll review the pattern in a day or two. It’s fabulous, also!!


Found the website for the necklace. Artisans of Lebanon, at 30, rue de Varenne in the 7th Arrondissement, not far off Boulevard Saint-Germain and not far from Musée Rodin. Fabulous long necklace, embroidery floss crocheted onto a copper chain, with clusters of beads and sequins crocheted at random intervals. Long enough to wrap three times around one’s neck— or leave long à la roaring twenties.

Brought this bracelet from the same store to DGD for her 10th birthday and almost didn’t give it to her. Of course I had to wear it several days on my trip to make sure it was good enough for her. ☺

Almost There

imageI’m on the last row of the last square of six 25″ x 25″ squares of Tyler’s blanket. Five of the squares have been blocked. Four of the squares have been sewn together.

I’ll finish it before the cold weather sets in, I hope. I’ll finish it before I leave for Frankfurt on November 8, I hope. I’ll breathe a sigh of relief when it’s done, I know!!

Here’s the previous post on this topic.

I don’t need any Good Mom points for this activity. My account is already overflowing beyond belief.

Training Them Early

Boston 2
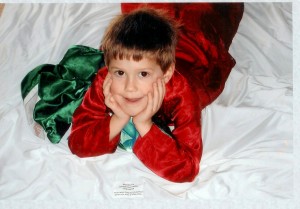
I posted a photo on Facebook yesterday that brought me so much joy I just wanted to share it here. This photo is from late 2006, a couple of months before my darling Boston and his family moved from Tucson back to Youngstown. It was taken in my home in Tucson, where I hosted frequent sleepovers for Boston and his sister.

There are three facets to this photo: 1) the blanket on which he is lying; 2) the green blanket to his right; and 3) the red pajamas he is wearing.

1) When Boston’s daddy, DS#2 Tyler, was born, a friend gave me a bunting for him that zipped open into a blanket. The fabric on the inside was sort of a silky nylon, like a fine nightgown. Tyler was sick quite a bit as an infant, and would either lie on my chest in bed stroking my nightgown, or lie in his crib stroking that bunting fabric. Three years pass, the blanket gets too close to a space heater and is burned. I remake it into a pillow. A few more years pass. His father and I divorce. His father plays some sneaky tricks and gains custody. A while later I learn that his grandmother, who treated me like I was the devil’s sister, has thrown his pillow away.

Several years later I move to Washington, D.C., and remarry. My boys spend summers with me. One summer, at about age 10, Tyler asks if I’ll make him another blanket. I choose a sports car flannel for one side and a nightgown nylon knit for the other and sandwich that around a quilt batting. He loves it and sleeps with it whenever he’s with me.

Four years later, I regain custody of him and we live happily ever after. He goes to a prestigious arts boarding school, then to Youngstown State University on a full scholarship. In Youngstown he meets the woman whom he will marry and with whom he will have two beautiful children.

My life stumbles along—various husbands, relationships, houses. Always, the sports car blankie is tucked into the linen closet.

In 2003, my then-current fiancé decides he “wants to be alone” (and marries someone else 10 weeks later, but that’s a different story …), and I move to a home in far northwest Tucson, a mile away from two-year-old Boston and newborn Ridley. My new home has a bedroom just for them. On Boston’s bed is Daddy’s sports car blankie. Three years later, I move to a house in midtown Tucson. Again, Boston’s bed is covered with the blankie. Each time he sleeps at my house, he wants to hear the story of Daddy and the sports car blanket.

When he learns his family is moving back to Youngstown and realizes his grandma is not moving with them, he asks if he can take Daddy’s blankie with him to Youngstown. Of course I say of course. And he asks me to put a label on it. When I ask him what he wants on the label he thinks long and hard. The words change several times before he settles on the exact wording.

Can you zoom in on the photo and see the wording? It brings tears to my eyes every time I look at it:
“Boston’s Sleepover with Grandma
This was Daddy’s blanket when he was a little boy.”

That makes me want to just hug and hug and hug this child. Even if he is now almost my height!

Oh, by the way, this blanket came back to me last year for repairs and is again on his bed.

2. Continuing on the blankie theme: when he was born, I bought Boston a Barefoot Dreams receiving blanket and the matching mini blanket. (At that time, Barefoot Dreams made a mini blanket that matched the signature receiving blanket. They’re flannel on one side and charmeuse on the other. FABULOUS!)

Boston loved—instantly, from birth, loved—this blanket. His parents couldn’t get in the car with him without making sure the mini blanket (which came to be called his travel blanket) was along.

As he fell asleep each night and with each nap, he would rub the charmeuse binding with his thumb and forefinger. Pretty soon, the binding wore out and the blanket fell apart. I would drive to Nordstrom and buy another. After a while, Nordstrom stopped carrying them and I would search online for another, trying to find the best price. (And as you can see, these ain’t cheap blankets!)

At one point, his mother asked if I couldn’t just replace the charmeuse backing and binding. I purchased some polyester satin from Jo-Ann’s and did that. From that point on, I started making the blankets for him, letting him choose the colors he wanted. I would machine-embroider or appliqué some design on the flannel side. Once I held the iron too long on the polyester satin, so I added a little motif on that side. For Christmas one year, I made him a butter yellow satin and flannel blanket that was about 1.5 times the size of the original blankets. He’s now 12. He still sleeps with that yellow blanket. “Love” doesn’t begin to describe his feelings for and attachment to that blanket.

It warms a sewist’s (and a grandma’s) heart.

3) So, one day in Tucson on a Sleepover With Grandma, he was in my sewing room, wearing a pair of cotton pajamas I had made for him. He was holding his blanket and fingering the satin. He asked, “Can you make me a pair of pajamas out of this material?” Of course, I replied in a flash, always wanting to grant his every wish. And what color did he want? His favorite color, naturally. Red.

Thus were born the red satin pajamas. For a five-year-old.

Don’t you love the imagination of children?

So, back to the title—”Training Them Early”. For what am I training them? Why, to love fine fabrics and hand-crafted items, of course.

The Guinea Pig Shirt

MissoniFullimageWhy, oh why, do I keep trying patterns no one has made before?! (Or at least no one has written a review or a blog post.) I must be a glutton for punishment, or else I’m emotionally bonded to my seam ripper!

Today’s newbie pattern is Vogue 1363 in Sandra Betzina’s “Today’s Fit” line.

imageI liked the layered look of View A. This has been my year of mixing prints, so I thought I would have some remnants that would work together with the Missoni-esque ITY fabric that I picked up at Vogue Fabrics’ booth at the Pittburgh Original Sewing & Quilt Expo.

Soooo, let me tell you about this pattern:

Pattern Description: MISSES’ TOP: Loose-fitting, pullover top has narrow hem. A: neck band, sleeve bands and insets.

Pattern Sizing: “Today’s Fit” by Sandra Betzina. Combinations: (A-B-C-D-E-F-G-H-I-J) All sizes in one envelope. I cut an E, cutting the shirt hem at the G line (basically adding an inch to the shirt length).

Did it look like the photo/drawing on the pattern envelope once you were done sewing with it? No, because of all my modifications.

Were the instructions easy to follow? Fairly easy, but I disagree with some of the methods used (with all due respect to Sandra Betzina, with whom I have studied and whom I admire).

What did you particularly like or dislike about the pattern?

Likes

  1. I’m busty. FBAs intimidate me. Sandra’s explanation was clear and easy and—for once—the bust fit exquisitely. (If you aren’t familiar with FBAs, and you make this pattern, pay more attention to the illustration than the text of the FBA instructions. Put your logical-thinking cap on, and you’ll be fine.)
  2. Edited on 2014/1/11: Linda C. in Phoenix called me out on this – see her thoughtful post below. (I deem it thoughtful because she was very kind in pointing out my ignorance!!) What Sandra does is a dart adjustment, not an FBA. For excellent discussions of various types of FBAs see Shams’s Busty Info section on her brilliant Communing With Fabric blog. Note, especially, her FBAs in Knits post. Thanks, Linda, for pointing out my misstatement.
  3. Another like that I haven’t tried yet: Sandra includes instructions for converting the shirt to a sleeveless version. Will definitely try this next spring.
  4. I liked the layered-look design. Had I chosen a different fabric for the inset, the design might have worked for me.

Dislikes

  1. Curved seam application of neck inset and neck band. No, no, no. DO NOT staystitch and clip. This is why we work with knits–they’re flexible. And especially if you’re working with a stable knit. The stay stitching is an unnecessary step, IMO. The clipping just weakens the seam. And if you’re using a mesh fabric, all those clips just give you a hot mess, both in the infrastructure and visually. But, most importantly, it weakens the seam.
  2. Several small pieces had ⅝” seams. I think it would have been easier to work with ¼” seams. Just my opinion. I think a neck binding, seamed at ¼”, or even a folded binding—stitched, wrapped, and top-stitched—would have worked much better.

Fabric Used: Missoni-esque ITY knit from Vogue Fabrics for the body, the yummiest “über-soft rayon jersey” from GorgeousFabrics.com for the sleeves, and a black “soft nylon mesh”, also from Gorgeous Fabrics, for the inset, but not used.

Pattern alterations or any design changes you made:

imageThe picture shows the neck with inset. The mesh was used for the inset. The pattern says seam, then serge or finish and trim off ⅜”, pressing the seam allowance toward the inset. But if you’re using a sheer, you can see that seam allowance. To my eye, this was not pretty. What if the body were solid and the inset was done out of any of these mesh knits Marcy offers or this or this from Ann Steeves’ Gorgeous Fabrics? imageWith a mesh like that instead of what I used, you wouldn’t see the seam allowance. The issues I had with this neck and sleeve would have gone away. (But look what a beautiful job I did with the insertion!)

On the neck band, I didn’t want a super black ring around my neck, so didn’t think that wonderful black rayon that I used on the sleeves would work on the band. I tried making the band out of the mesh. #fail. I tried recutting the band to be deeper and cutting the existing inset shorter, so I would have about ½” of mesh showing and about 1½” of rayon knit for the band. #fail. Too much visible seam allowance. (VSA?) Too much messymessymess.

imageFinally, after thinking and cogitating and scratching my head, I cut off the sleeve inset and band, and cut off the neck inset and band. I hemmed the sleeve with ½” turned hem, and left the neckline raw. There are so many topstitch lines and pseudoserger lines, you’ll never know it’s raw!

Would you sew it again? Would you recommend it to others? I do like the layered look, and will probably try it again, rethinking the neck finish, and absolutely choosing fabrics that are more appropriate. Will make View B for 10yo DGD, who should fit the size A perfectly.

Conclusion: I’ve been hearing about ITY for nine months and have been curious to try some. Now I have, and highly recommend it. Lovely to sew with.


And what to wear it with? I think I’ll try scrunching up the hem and putting it on top of black jeans and flats. Is it going in the suitcase to Europe in a month? Probably not. I think it will be going to the grocery store. (That is to say: I like it but I don’t love it.”)

Why the title “Guinea Pig Shirt”? Because I was the guinea pig to try making this shirt without having any one else’s experience to draw upon.

It’s Spring Somewhere, Right?

NanetteSeatedI’ve been feeling like I look o*l*d lately, and I don’t like it. This aging process—for me, anyway—is a depressing exercise in futility. My hair includes lots of salt’n’pepper around my face, and I don’t think it’s flattering. So I thought maybe if I make some brighter clothes, instead of all the muted colors and black, maybe I’d feel/look younger.

NanetteDescI saw this piece of Nanette Lepore cotton bouclé knit on Emma One Sock’s ever-tempting and wonderfully organized site and thought it would be a fun color with which to test out my new anti-aging theory.

My goal was to make another Hemlock Tee, cutting the bottoms a little longer, and the back longer than the front, and curve the hems at the side seams. I wanted to try a technique I’d dreamed about on Katherine Tilton’s long slim skirt. I recently purchased some Soft Stretch Fusible Tricot from Sarah Veblen’s online store. I [rotary] cut some ½” strips going the width of the interfacing, so they were 20″ wide—manageable for fusing.

Photo-bombed by Rudi!

Photo-bombed by Rudi!

I fused these in the seam allowance on the back shoulder seam allowance (of course—de rigeur!), and then all along the side seams and hems (but not the curve). On the curves, I carefully fused several small pieces (1″ or so) inside the seam allowance. My goal was to have a stable base for double-needle stitching. (So the seam allowance on the curve would have several layers when folded up and pressed, but the fused interfacing would keep the stitching smooth.) After fusing, I pressed the hems and curves up the ½” for the top-stitching.

After all the fusing was done, I seamed the shoulders and top-stitched at ⅜” (note that the seam allowances on this pattern are ½”, not ⅝”). Then I sewed the sleeve to the shoulder—double stitched seam, no top-stitching and not yet sewing the underarm sleeve seam. Then I sewed just the side seams, starting about 1″ below the point at which the sleeve seam would begin, and stopping about ½” above the curves. This was a single-stitched seam, pressed open. NanetteStitchingThen I put in my double needle and, from the right side, stitched all the way around the front and then the back (two separate passes: 1. front; 2. back), beginning and ending just under the sleeve at the point I started the stitching for the side seam and including the curves and hems.

Look at that smooth seam. Look how the fabric opens cleanly for the stitching on the curves. To me, that’s the way to finish a hem such as this. (I want to go back and add a bar tack on each side to give that seam opening a little more stability, but other than that, I’m thrilled with the result.)

This exercise, while the rotary cutting and fusing took time, gave me a beautiful, stable hem. In my humble opinion.

The boys wanted to get in on the photo session.

The boys wanted to get in on the photo session.

The other process I did differently for this version of the Hemlock Tee was the neckline. Instead of doing a neck binding, I did a facing. I sewed the back and front pattern pieces together for a couple of inches at the shoulder seam. (Fortunately, I had traced the pattern PDF onto good pattern paper that I purchased from Vogue Fabrics when I saw them at the Original Sewing and Quilt Expo in Pittsburgh (sorry, no link – can’t find it on their site).) Then using another piece of the tracing paper, I traced a pattern piece copying that neckline, 2″ wide. I seamed it at the back and applied it to the inside of the neckline, wrong sides together. I double-stitched the seam, then trimmed it, pressed it flat, then turned the facing to the outside and pressed the life out of it. Then, again using the double needle, I topstitched all the way around about ⅛” from the edge. The knit fabric wants to roll anyway, so this gave me a little roll-up edging on the exterior neck facing. (☺ Oooh, feeling smart!)

Sewed the sleeve seams in a double-stitched seam, trimmed, pressed seam allowance to the back, pressed up a ½” hem on the sleeve and top-stitched. Voila! All done!


Well, that’s the end of the construction part of this top. The Jazzman was working at his workbench in the basement, around the corner from my sewing room. I slipped the top on and walked out to show him. He said, “It’s bright.” I told him that was what I wanted. I thought I looked old and drained lately with all my gray hair, and that maybe the brighter colors would help me look nicer, brighter, younger, less drained. His response? “Well, you could just color your hair and save all that money on new clothes.”

Hmmm. He’s such a guy!!!

(And if you know me well and have much experience reading the posts on my other blog, you know that I took that to mean that he hates the color of my hair and thinks all my sewing for the past 6+ months has been for naught. Oh, the angst of the Little Adoptee! So annoying!)

So what do you think? A) Would you wear this color in the fall? (Note that when I work, it’s from home, so I hardly ever go out of the house.) And B) Do you think colors such as this unseasonal hot pink make one look brighter? (Well, it’s not unseasonal in the Southern Hemisphere. Maybe I should just go down there for a couple of months.)

A note re the Nanette Lepore fabric. I’m a fan of Nanette, who is a native of Youngstown. The Jazzman is sorta distantly related to her, as everyone in Youngstown is related to everyone else. His closest cousin’s wife, Michelle, is Nanette’s sister. I frequently moan to Michelle about Nanette’s limiting her range of sizes at 12. Grabbing this fabric from EOS was my own little way of having a piece of Nanette Lepore’s line in my closet.

I’d love to hear what you think about the color.

It’s a Learning Exercise

imageEvery year the Jazzman and I spend the week of the Fourth of July in a cottage at Madison Shores in Madison-on-the-Lake, along the southern shore of Lake Erie. Many of the families who summer there come from the Youngstown area, and have been staying in the same cottages in this development for 20 years. The sense of community is strong.

On the Fourth of July, there are organized games for the kids. It’s a big deal! And I’m patriotic, so I want to wear something appropriate to the day while I watch my grandkids get their game on.

This year, in the midst of my knit top sewing frenzy, I found this cute red, white, and blue rayon/lycra super-stretchy knit at Emma One Sock. I don’t know what I was thinking when I chose it, but I expected larger dots. Duh! Linda puts the ruler in the photo; it’s not hard to see the exact size of the dots.

I decided to make it up in Katherine Tilton’s Vogue 8793, with a single overlapped collar. I didn’t want a self collar, and was short on time before leaving for the Lake (When will I ever learn?!), so ran to Jo-Ann’s and picked up a bit of white 95% rayon/5% spandex for the collar.

I made this top once before, and it goes together quickly. It’s a quite basic pattern with Katherine’s artistic flair polishing it off. But when I slipped this top on after finishing it, I looked in the mirror and shuddered. Inside my head, I screamed, “I look like I’m eighty!!!”

imageI ripped it off, grabbed stencils and paints and tried to give it a little pizzazz to take the viewer’s eye off all.those.dots. Nope. No joy. I folded it and set it on my “what next” table.

Last week I was able to pick up Marcy Tilton’s out-of-print modern twinset, Vogue 8559, for half price on eBay, so decided to remake this t-shirt into a cute little tank.

[Sidebar: I need to rethink this t-shirt. I wore it the last time I went to Asheville to visit my mother. She looked at me and said, “That’s a funny shirt,” in that way she has that you know means, “What a butt-ugly shirt. What were you thinking when you bought that?!” Every time I’ve worn the shirt since that visit, I haven’t liked it. I’m past 60 and I still crave my mother’s approval. At what age will I quit caring about the thoughtless, critical words that come out of my her mouth?!]

imageAfter taking the t-shirt apart, I laid out the tank pattern. I had to piece the neck and armhole bands from the sleeves of the shirt. When the tank was complete except for the hem, I threw it on, with a jean jacket over, to run to the grocery store. After wearing it for half an hour, I noticed that the armholes have a little gaposis.

The solution would be to remove the armhole bands, cut them shorter, and reapply, stretching more to eliminate the gaps.

Am I going to do that? Probably not. I have five items on my sewing room to-do list, and not enough hours in the day.

What I learned: I like this little modern twinset, and will make it again. And I know what to do about the armholes.

The Do-Over, All Done

imageRemember the blanket that was my vacation project? It’s all done now. And it’s beautiful.

The knitting? Not perfect. But the blanket that was the result of all those do-overs? Soft and cushy and wonderful.

imageI believe I paid more for this Spud & Chloë yarn (four hanks of Outer, two hanks of Sweater) than I’ve ever paid for yarn. But the hand of this yarn—55% superwash wool and 45% organic cotton—is what makes the blanket feel so wonderful. I can envision making one four times the size for the adults in the family to cuddle up in.

All the trouble I had constructing this blanket? Totally worth it.

I’m not sure who will be the recipient of this blanket, but that’s one lucky baby!

(Oh, and I made the teddy bear, too.)

The Dress From Hell

DFHThis post could have many titles. I considered “Oh, Gawd”‘ “Love/Hate”,”Give Me Back My Premenopausal Body” … you get my mindset?

Let me just begin by saying that I have the utmost respect for the person who designed Vogue 8920. The pattern illustrations indicate a truly lovely dress. My praise stops there.

Pattern Description: MISSES’/MISSES’ PETITE DRESS: Pullover, lined dress (close-fitting through bust) has neck band, side front and side back seams, side godets, and narrow hem. A and B: raw edge finish on sleeve hems. B: hem band. (Are you *#%^ing kidding me? After everything else you go through on this dress, you leave the sleeve hems raw? Hmmm.)

Pattern Sizing: Combinations: Y(XSmall-Small-Medium), ZZ(Large-XLarge-XXLarge) I cut a Large.

Did it look like the photo/drawing on the pattern envelope once you were done sewing with it? After a fashion/Loosely.

Were the instructions easy to follow? Somewhat.

What did you particularly like or dislike about the pattern?

Like: The semicircle skirt is fun.

Dislike:

  1. The dress is lined, I guess because of the recommendation of a sheer knit for the body. However, the dress is constructed with the right side of the lining to the wrong side of the dress. Again, I’m assuming this is because of the sheer knit. I would much rather see a clean inner garment. I went over and over this in my mind, but the under-bust seam and the construction methods made it impossible to change this. (In retrospect, I wish I had skipped the lining.)
  2. If I have a skirt where the bottom circumference is more than 4 yards, I believe it makes much more sense to hem the band first and then sew it on. I seamed the bottom band, biascut ½”-wide strips of a light interfacing, fused the strips to the bottom of the band, folded up that ½” hem and pressed, then double-needle stitched the hem in place. That process took 1½ to 2 hours. Really.
  3. Then there’s the issue of the ruffle at the bottom of the lining. I have one word for that: Why?! This dress is lined with tricot lining fabric. It has no body, by design. If I had used a sheer knit for the body of the dress, as suggested, this ruffle would still have added nothing to the dress. Tricot does not a crinoline make!
  4. When I got to the end of the instructions – the final step was to seam the ruffle together (four ~60″ 11.5″-wide panels of tricot), then gather and seam it onto the bottom of the lining) – the instructions ended. There was not one single word about the hem of the lining. Am I supposed to leave it raw? Okay, then tell me I’m supposed to leave it raw. This pattern is marked Easy!!! You’ve got to talk to me like I’m a sewist who will tackle an “Easy” pattern. Tell me, overtly, explicitly, that I can leave the lining unhemmed as the tricot will not fray.

Fabric Used: Lovely weight of knit in a Klimt-esque print from Vogue Fabrics. It’s either rayon/lycra or poly/lycra. I can’t remember, nor can I find it on Vogue Fabrics’ site. (It’s so pretty it’s sold out.) But it’s beautiful and feels nice. I wish I had used it for something else, like another great Marcy or Katherine Tilton top.

Pattern alterations or any design changes you made: Added cap sleeves.

Shortened the hem band/ruffle because I ran out of the main fabrics. There was only enough fabric for 7.5″ bands rather than 11.5″ bands. I made a muslin and the neckline seemed a little low, so I raised it by about ½”.

Would you sew it again? Would you recommend it to others? NoNoNoNoNoNoNo.

Conclusion: Wasted about $60 of fabric on this one. But I’m gonna pull up my big girl Spanx and wear it to a family wedding tomorrow anyway. (This was written before a night-long rain.)


I saw this pattern when Vogue introduced the Fall 2013 patterns. I thought it looked lovely—flowy and feminine. While googling to see if anyone had constructed and reviewed the pattern, I noticed that T. Sedai, in her “Sew Skate Read” blog said, “V8920 – I feel like this is a few rhinestones short of being ready for dancing with the stars….” Undaunted, I set out to prove her wrong, to prove that this was a lovely and wearable dress.

In concept, the dress is flattering. But when I put it on and look in the mirror, all I see is a 15-pounds-overweight post-menopausal woman. [Sad Face Emoticon] And I spent my week on this dress, rather than spending every morning at the gym.

Gathering that damned ruffle onto the lining reminded me of this awful gathering process for
Ridley’s fairy princess costume several years ago.

I finished the dress at 11:00 p.m. on Friday night. Slipped it on in front of the sewing room mirror, and noticed I could see lining hanging down in places. Grabbed scissors and started whacking away at the lining. Came upstairs, slipped on the chosen shoes-to-accompany-dress, woke the Jazzman up where he sat—remote firmly gripped in right hand—in front of talking heads. Stood in front of the family room mirror and shook my head as I noticed that the hem droops on the left side. Then I heard him say he could see the lining in the back. Today’s activity will involve putting the dress onto my dress form and whacking off more of the ruffle. Or the entire damned ruffle.

WTF. Honestly, just WTF!!

Listen, Vogue designers and editors, if a pattern will ONLY work with a specific weight of fabric, tell us!! We pride ourselves on taking your patterns and making them our own. I’ll bet lots of sewists will look at this pattern and see a knit they think will look pretty on them. Tell them not to do it!

And while we’re on the topic, charmeuse?! Really? You’re going to take a lightweight, sheer KNIT and attach a WOVEN band of charmeuse to the bottom. On a pattern marked “Easy”? This is a recipe for disaster!

Okay, I’m almost out of steam here. I just want to say about my asymmetric hems on a garment designed with symmetric hems: I don’t know where these came from. I refuse to believe this is user error. I put those godets in perfectly. The saggy hem must be a function of too-heavy fabric. I guess. I don’t know where else to assign blame.

And to add insult to injury, it has rained all night. The rain should stop by noon. The wedding is outside at 4:00 p.m., a mile from Lake Erie. The shoes I need to wear with this dress are patent slingback platform pumps. Soggy ground and those shoes do not compute. I will not wear this dress.

I think today I’ll wear the same thing I wore for my mother’s 100th birthday party in May. With old black flats that I don’t care if I ruin in the wet grass.

Was there joy in making this dress? There was the joy of anticipation, of the vision in my head of what the dress would look like finished and on me, of the compliments I’d get when wearing it. There was the joy of half an hour of handwork while stitching the lining to the neckband.

Will I ever wear the dress if I don’t wear it today? I’m not sure. After I finish the next five garments listed on my sewing room To Do whiteboard, I may lay a couple of tunic patterns out over it and see if there’s enough fabric to turn it into something else. I do love the fabric!

I’m not sure what lesson I learned from this project. I guess maybe the “knit muslin” lesson will be enough.

Oh, yeah, and that not every garment is going to be a success.